Licensed Home Inspector DOL#368 Licensed Structural Pest Inspector WSDA# 76712
Summary
Client(s):
Happy Client
Property address:
1234 Some St Bellingham WA 98765
Inspection date:
Thursday, July 9, 2020
This report published on Saturday, May 15, 2021 12:07:28 PM PDT
This is not the complete report. This is the report summary. The concerns listed here are, in the inspector's opinion, more likely to be the higher priority issues that require immediate attention. This summary is not numerically sequential as it plucks descriptions from the full report but leaves them at the same number they had in the full report. Since a client might put more priority on some concerns, that might seem routine to an inspector, the non-summary items should not be ignored. The client should read the full report. This report is the exclusive property of CURTIS C HOME INSPECTION SERVICE, LLC and the client(s) listed in the report title. Use of this report by any unauthorized persons is prohibited.
Concerns are shown and sorted according to these types:
Cautionary
A recommendation to enhance safety. Not necessarily urgent but, in some instances, it might be
Replace/Repair
Plan on replacement,, or repair, with work to be done by qualified parties
Repair/Maintain
Recommended repairs that may involve ongoing upkeep. Work to be completed by qualified parties
Review/Evaluate
Qualified professional to service/repair/replace/evaluate. Or, as applicable, clients to evaluate information and determine their level of concern
Maintenance/Service (repair)
Requires maintenance, professional service or appropriate repair
Visual limitations
Condition that, potentially, conceals moisture-related issues or damage. At client's option, accept as is/maintain or arrange for further evaluation or invasive contractor review
Monitor
Keep an eye on (periodically monitor) the condition or device. Maintain, repair or replace as might be required
On-site notes
Observations, comments or suggestions noted by the inspector
Informational
Informational comment, but might include recommendations for small repairs or upgrades
Infestation
Evidence of the presence of, or damage from, wood destroying organisms
Damage
Damage caused by weathering, deterioration or wood destroying organisms
Conducive conditions
Conditions conducive for wood destroying insects or organisms (Wood-soil contact, shrubs in contact with siding, roof or plumbing leaks, etc.)
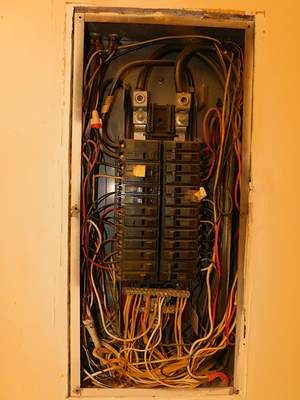
Exterior & Site
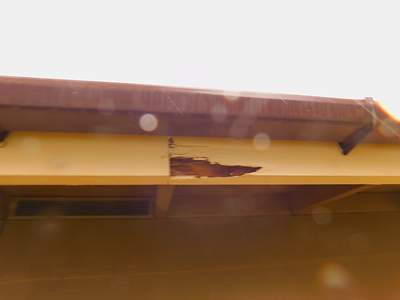
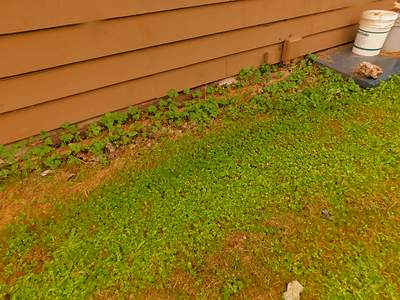
9) Wood decay fungi (rot) was apparent at wood trim, most notably at the fascia on the south side and the south east corner of the barge board. In a related matter, siding is close to earth and various areas of the siding. I recommend removing any materials in contact siding around the perimeter of the structure to prevent premature deterioration at siding and further evaluation by general contractor: Locate and remove any compromised siding or trim, replace with sound materials. Clean and prep (caulk and/or flash, as applicable, to protect against seepage) and complete the job by applying an appropriate exterior finish. Eliminate conditions that are conducive to the development of rot. Establish at least 6" of clearance between earth and wood, a 4" gap between earth and fiber cement or masonry products, and approximately 2" of separation between flat surface paving and exterior trim or cladding. As applicable, grade soil at a slope ratio of 1" per foot, for a minimum 6 ft out from the building, so runoff water is directed away from the structure. An online video, produced by King of the House Inc. on the topic of rot, may be accessed at this link: http://youtu.be/6p8q1Pa1H_U
Photo examples:
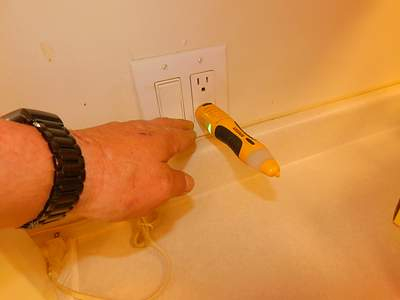
Photo 9-1 Photo 9-2
Photo 9-3 Photo 9-4
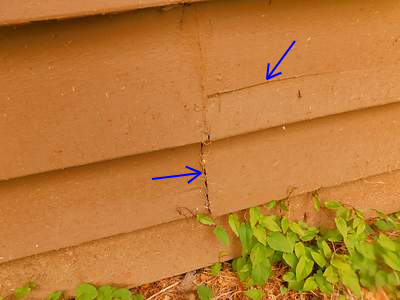
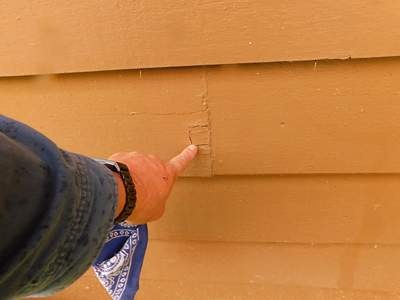
10) Siding:Damage, buckling, cupping was present at wood siding. I recommend further evaluation by general contractor: Locate and remove any compromised siding or trim, replace with sound materials. Clean and prep (caulk and/or flash, as applicable, to protect against seepage) and complete the job by applying an appropriate exterior finish. Contractor, while onsite, to suggest other beneficial repairs or upgrades. An online video, produced by King of the House Inc. on the topic of rot, may be accessed at this link: http://youtu.be/6p8q1Pa1H_U
Contractor to repair or replace siding on a case-by-case basis as necessary. Photos below are an example of damaged siding:
Photo 10-1 Cracks at lap siding and gaps at butt joints can allow moisture behind material, promoting premature deterioration. Photo 10-2 To prevent premature deterioration, any damaged siding should be repaired or replaced prior to caulk and paint maintenance
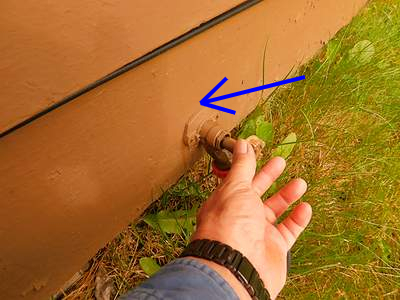
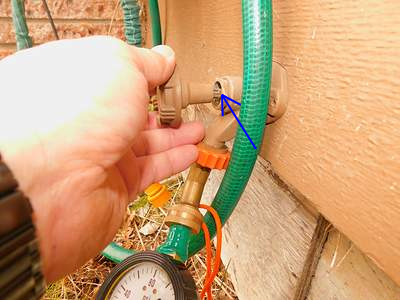
11) The faucet/hose bibb(s) leaked during a standard water pressure test. This test puts back pressure on a faucet, not unlike having a nozzle in the "off" position on the end of a hose. The faucet at side of the structure appeared to have freeze damage, excessive water flowed through the wall when the valve was turned on. I recommend replacing the damaged hose dim faucet at the East side of the structure, work to be performed by qualified plumber. The faucet west side of the structure leaked at stem while under pressure. I suggest tightening the bonnet (looks like a nut) at the valve stem. If any complications arise that go beyond the scope of routine maintenance, consult with a plumber. Based on appearance, the device(s) is probably of frost-free design (less likelihood of seasonal freezing) but, since no means of backflow prevention was apparent, anticipate an elevated risk of gray water entering the potable water system. Inexpensive backflow prevention devices that screw on faucets are available at home stores. If hoses are left on faucets in winter, or if the piping runs through unheated space, even frost-free hose bibbs and pipes are susceptible to seasonal freezing. For additional information on hose bibb leaks, follow this link: http://goo.gl/2WQ9OJ
An informative article on backflow prevention and various types of frost-free faucets, is available here: http://goo.gl/B6nMVc
Photo 11-1 Hose bibb at the east side of the structure appeared to be frost damaged excessive water flowed from the wall when turned on. I recommend a qualified plumber replace East exterior faucet Photo 11-2 The hose bibb at the west side of the structure leaked at the stem while under pressure . Typically this can be corrected by tightening the bonnet, or replacing gaskets inside the valve. Additionally, the valve handle was loose at the faucet at time of inspection. Work should be performed by qualified party
Roof
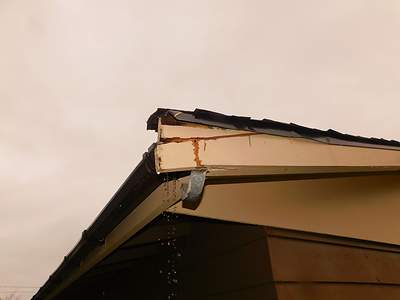
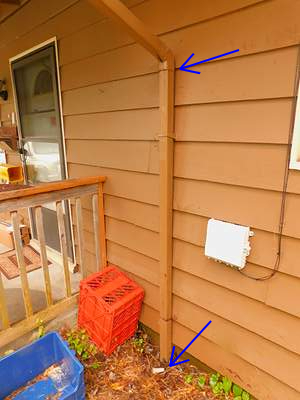
21) Plastic gutters and downspouts were installed. They're often installed by homeowners rather than qualified contractors because they're inexpensive and easy to install. Gutters are more likely to overflow due to a substandard slope when installed by homeowners. Most professional contractors install seamless metal gutters and metal downspouts. Plastic gutters and downspouts eventually degrade and become brittle when exposed to sunlight. Plastic gutters are often undersized, are more likely to come apart and leak, and are more easily damaged by extreme cold, snow, ice, tree branches and ladders. Consider having a qualified contractor replace plastic drainage system components with metal.
Gutters contain accumulated debris. That condition impedes drainage and can result in overflowing, seepage at ends/corners/where downspouts attach, and even deterioration of roof sheathing at the eaves. Clean/maintain gutters, downspouts and any associated drains and connections. If necessary, reseal ends and corners and/or adjust slope. As applicable, consult with a gutter and downspout repair or installation contractor.
Downspouts or fittings are loose/detached. Uncontrolled water runoff is conducive to the onset of rot or attracting other wood destroying organisms. Upgrade/repair downspouts and gutters if/as required. If necessary, consult with a gutter and downspout installation contractor.
Depending on length, overall exposure and runoff water, gutters with open ends, or downspouts that empty onto the roof, exert stress on roofing materials, fascia and/or cladding and contribute to moss growth.
Photo examples:
Photo 21-1 It was raining and the beginning of the inspection, at that time water was noted to seep out of the upper connection of the downspout near the front entry in the downspout itself terminated next to the foundation. Photo 21-2 Downspout at the northeast corner was missing, water damage has occurred to the siding that corner and uncontrolled roof runoff can contribute to water in the substructure. This photo illustrates the necessity for gutter and downspout repair and siding repair and maintenance.
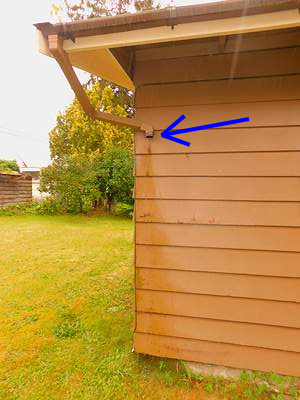
Photo 21-3 Another example of uncontrolled roof runoff is the missing downspout at the northwest corner. Ideally, gutters should be continuous at lower edges of the roof and downspouts installed, drinking water away from the foundations
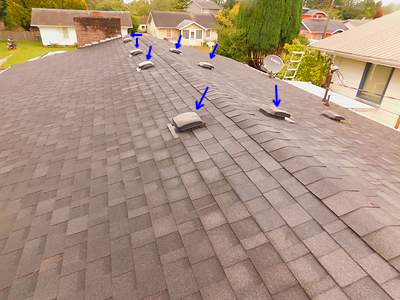
22) Competing ventilation: This roof has gable vents, soffit vents and high vents. Best practices, based on current data, discourage mixing gable vents with other types of ventilation. Roof-attic ventilation is most effective when it is balanced, approximately 60% of airflow (intake) from low soffit vents and about 40% of airflow (exhaust) from high vents such as ridge or roof box vents. The gable openings might interfere with primary (high and low) venting. Inadequate airflow can contribute to overheating in an attic, lessen the life of roofing materials, or result in moisture condensing on the underside of roof sheathing. Discuss this venting configuration with a roofing contractor. In some cases, gable vents are blocked and overall roof-attic ventilation is actually improved upon. For a detailed description of issues that might develop as result of "competing ventilation," please visit: http://goo.gl/cwktRB
A simple calculator, designed to estimate the sufficiency of ventilation, may be accessed at this link: http://goo.gl/C0yd8G
Photo 22-1 Roof box vents Photo 22-2 With box vents installed, typical recommendation is to block open gable vents to eliminate competing ventilation.
Also, gable vents were noted on both ends of the structure, this photo is the West end, and was noted to be missing a screen at the louvers which can allow vermin into the attic. I recommend blocking both vents for the aforementioned improved ventilation and to deter vermin intrusion
Attic
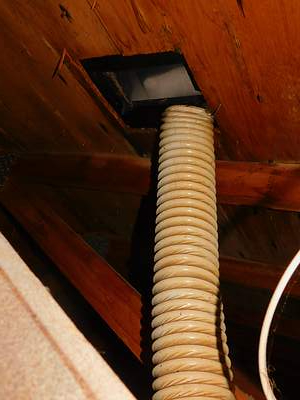
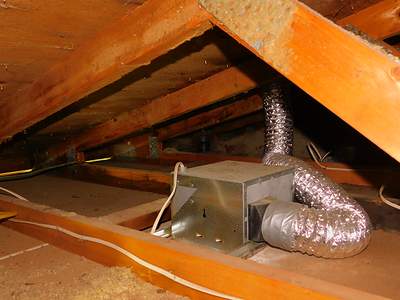
28) The kitchen exhaust fan duct terminates in the attic, not vented to the outdoors. This deficiency can result in excess humidity and moisture-related problems. I recommend further review: Repair/replace, so exhaust air is ducted outside. All work and evaluation to be completed by qualified party. For information on connecting and/or insulating ducts, please visit: http://goo.gl/xPS7Ds
An air handling ducts -- kitchen and bath exhaust -- were not insulated in the unheated attic. Lack of insulation wrap, depending on air temperature, can result in sweating at the outside, or inside, ducts. I recommend further review: Install R-4 insulation, blanket, batt or sleeve around exhaust/air handling ducts. All work to be completed by qualified party. For information on insulating and/or connecting ducts, please visit: http://goo.gl/HcksNZ
Photo 28-1 Photo 28-2
Electric System
35) Split bus electrical panel: The panel is old-fashioned, split bus type, with no "main" breaker. Usually, such a system is controlled by six breakers near the top of the panel: Shutting-down ALL power involves turning off any breaker labeled as the "main" or the "sub-main" and, ALSO, turning off certain other breakers. These panels are no longer being manufactured or installed, but they are still commonly seen. Since the "sub-main" does not turnoff all power, uncertainty may exist as to whether or not the power has really been shutdown. Use precautionary measures if turning off circuits -- make sure the power is really off! I recommend further review. Discuss panel, and whether to keep it or replace, with licensed electrician. This contractor produced online video provides an overview into the operation of a split bus electrical panel: http://youtu.be/HwsyetxKS68
To read an article that describes in detail the operation of a split bus electrical panel, please click on this link: http://goo.gl/lsG0H2
36) The panel is overcrowded. This condition makes it difficult to carefully inspect the wiring, trace circuits, add circuits or work in the panel in the future. I recommend further evaluation: Licensed electrician to repair. While onsite, electrician to assess the electrical system, verify accuracy of legends, report any concealed defects/safety concerns and suggest potentially beneficial system upgrades.
37) The "main" service panel was inspected after first removing the front cover. A lockout device was not installed at the circuit for the baseboard. Lockouts should be in place at circuit breakers that control any appliances that are not within sight of the panel/disconnect AND if the appliances cannot be unplugged or switched off. Lockouts customarily "snap in" easily and they protect service personnel by making it possible to render appliances inoperable. I recommend repairs as necessary, work to be completed by licensed electrician.
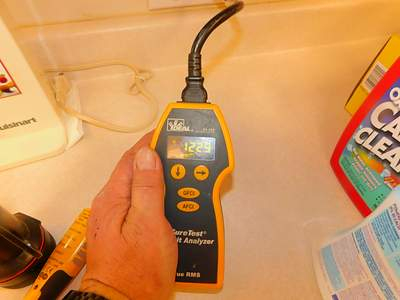
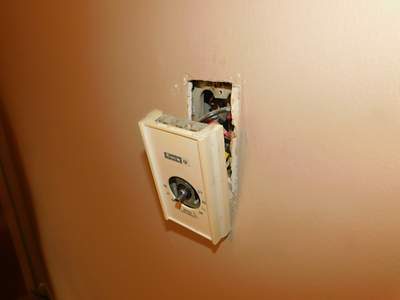
Photo 37-1 Cover was removed from electrical panel and wiring was observed Photo 37-2 Normal line voltage was observed while on-site
38) Ground fault (GFCI) protection: Receptacles that were readily accessible, and are situated at many locations that require GFCI protection, were tested. Those evaluated were operational and GFCI protected circuits were present at the bathroom. No other GFCI protected receptacles were found while on-site. Typical for the age of the house, there are fewer GFCI protected receptacles than would be installed today. The inspector does not test receptacles that are in excluded locations, obstructed from view, out in the yard, high on ceilings, walls, under eaves or in crawl spaces. GFCI receptacles or breakers reduce the likelihood of serious electrical shocks in damp environments. In 2014, GFCI protection requirements were expanded upon: Now the devices are installed at multiple 120 volt branch circuits. If wiring is modified in the future, depending on the scope of the project, the permitting process may trigger mandatory upgrades. State law compels an inspector to suggest updating GFCI protection to meet with present guidelines, which are more stringent than when the house was built. However, whether or not a client follows through on that recommendation is optional. A diagram, illustrative of current placement for GFCI and AFCI (arc fault) protection, is available at this link: https://goo.gl/8CfcKF
Below is a list, not necessarily comprehensive, that describes a number of locations that require GFCI protection:
- Outdoor receptacles (120V), except those designated for ice melting equipment (must be dedicated circuits) - Receptacles (120V) in garages, shops, outbuildings, crawl spaces, unfinished basements, mechanical rooms - Receptacles (120V) in bathrooms, laundry rooms, kitchen countertop areas (including islands, desks, kitchen sinks) - Any receptacles (120V) within 6 ft of the outside edge of any sink (utility, wet bar, laundry, kitchen, etc.) - Circuits (receptacles/outlets) at dishwashers - Receptacles (120V) supplying power to jetted tub pumps, motorized pool equipment and most other such devices, e.g., sump, ejector/grinder, well pumps)
Photo 38-1 Kitchen and exterior receptacles were not GFCI protected
39) Earth grounding: I could not verify the presence or the integrity of a service grounding electrode conductor and rod (based on era of construction, grounding would be typical, but sometimes difficult to confirm). A proper ground enhances overall electrical safety. I recommend electrician review and, if necessary, alterations or improvements to grounding system. While onsite, licensed electrician to evaluate the electrical system including bonding (requirements vary depending on piping, fittings) and report any concealed defects/safety concerns and suggest potentially beneficial system upgrades.
40) Circuit breaker(s), at least one location, is "double tapped" -- two or more wires are clamped in a circuit breaker lug that was designed for a single wire. Underwriters Laboratories has identified this as a safety hazard, since the conductors may loosen and arc or overheat. I recommend further evaluation: Licensed electrician to repair. While onsite, electrician to assess the electrical system, verify accuracy of legends, report any concealed defects/safety concerns and suggest potentially beneficial system upgrades.
41) This service, older house typical, amperage was not determined. Over the years, multiple appliances, computers, video systems, etc. have led to an increased demand for receptacles and power. At the present time, panels are typically, at a minimum, 100 amps and most panels are rated at 150-200 amps. I recommend review of the panel and the overall electric requirements, with work to be completed by licensed electrician. While onsite, electrician to evaluate the full system, verify accuracy of legends, report any concealed defects/safety concerns and suggest potentially beneficial system upgrades.
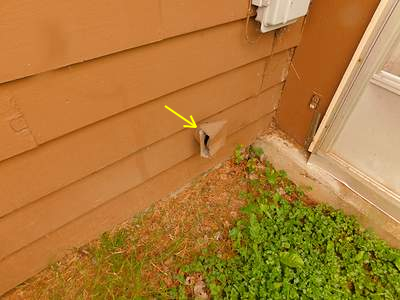
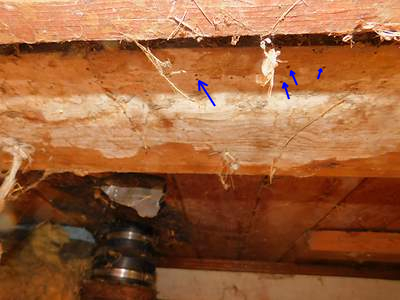
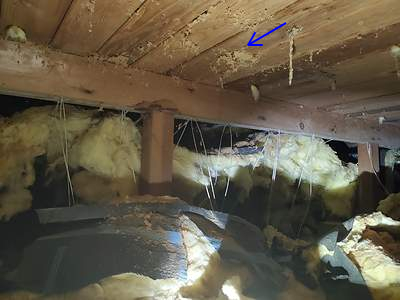
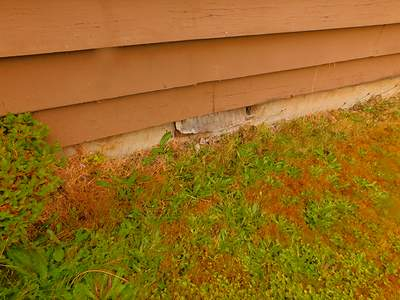
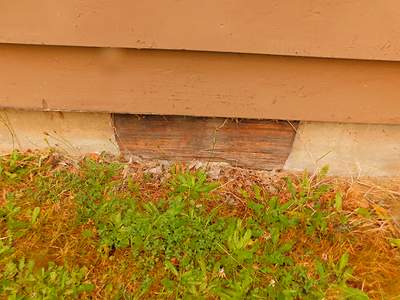
HVAC (Heating, Ventilation and Air Conditioning)
51) Electric heaters: The heaters were turned on. The baseboard heater at the south wall of the living room was loose to the wall. I recommend qualified party re-secure heater to wall. The thermostat at South bedroom was loose to the wall, I recommend a qualified party such as an electrician thermostat as necessary. Grill discoloration can be caused by concentrated heat as a result of dirt or lint at heating elements. Airborne particles in the environment enter heaters and partially burn, leaving behind carbon material that clings to grills. Exposure to burning candles or logs in fireplaces, cooking, cleaning supplies, pets, and plants can exacerbate the matter. In the case of all electric heaters, the devices are manufactured with long design lives, but they require periodic cleaning. Lint, dust and debris can block airflow, negatively impact efficiency, and increase the risk of fire. High voltage is present inside electric heaters: If covers are removed, circuit breakers to heaters must be TURNED OFF and "locked-out" prior to opening heaters.
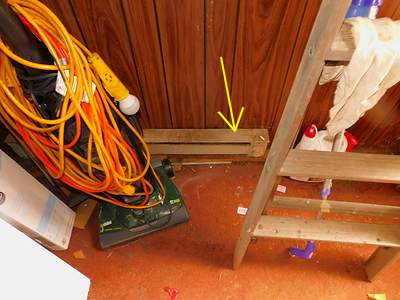
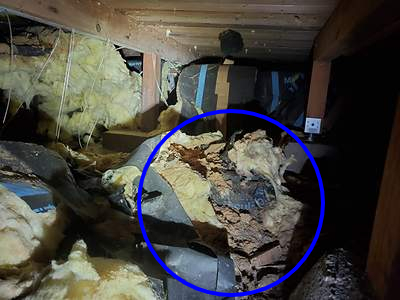
Non-operational electric heater(s). The baseboard heater at the north entrance, when turned on, failed to warmup. I recommend further evaluation: Replace/repair as necessary, with work and professional review to be completed by licensed electrician.
Bathroom heat: A manufacturer produced online video, general information applicable to cleaning electric wall heaters, is available here: http://youtu.be/HxQhyev5FfI
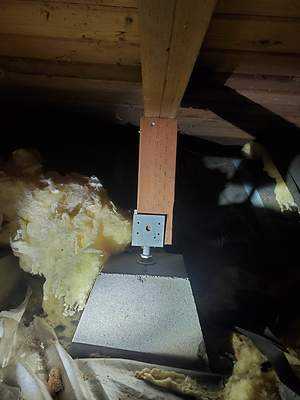
Baseboard heaters: An instructional online video, descriptive of maintaining and cleaning electric baseboard heaters, can be accessed at this link: https://youtu.be/i-u0URPnUP0
Inspection procedure: Detailed analysis of heaters is not provided, e.g., calibration of thermostats, condition of internal heating elements. The inspector does not estimate remaining life or track product recalls. Flammables, including furniture, towels, towel racks, linens, drapes, appliance cords, etc. should not be situated in close proximity to, or installed directly over, electric heaters. Maintain, as minimums, 6" of open space above and at least 2"-3" of clearance in front of heaters. Licensed electricians are prepared to work on electric heaters.
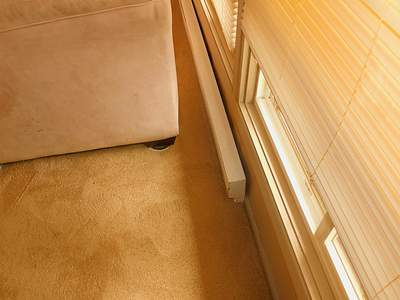
Photo 51-1 Thermostat at the south bedroom was loose to the wall and knob was damaged Photo 51-2 Baseboard heater at south side of living room was loose to the wall
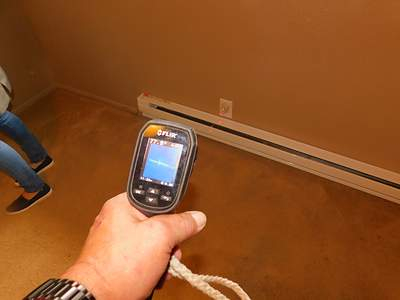
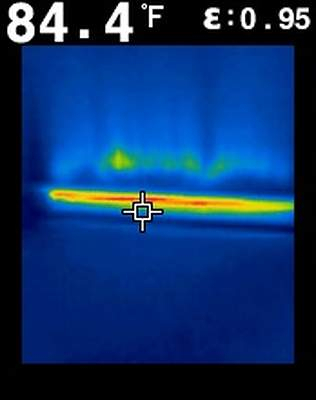
Photo 51-3 Baseboard heater at North entry vestibule was not operational at time of inspection Photo 51-4 An infrared imaging thermometer was utilized to determine heat at baseboard heaters
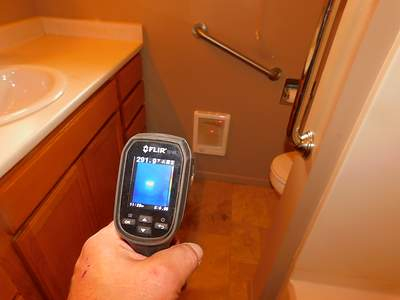
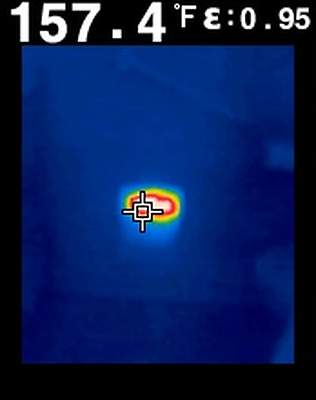
Photo 51-5 An infrared Imaging example of baseboard heaters turned on Photo 51-6 An infrared imaging thermometer was utilized to determine heat at electric fan assisted wall heater in bathroom
Photo 51-7 An infrared imaging thermometer view of fan assisted heater in bathroom turned on
Fireplace(s), Insert(s), Freestanding Stove(s)
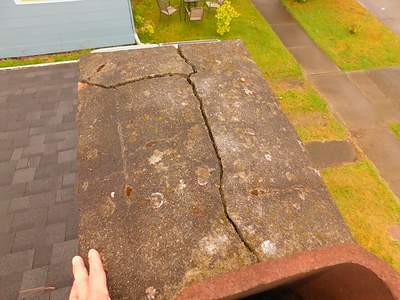
56) The chimney crown is cracked or damaged. Water intrusion to the top of the chimney structure is apparent. I recommend qualified party such as a chimney mason repair crown as necessary to prevent further damage.
Photo 56-1
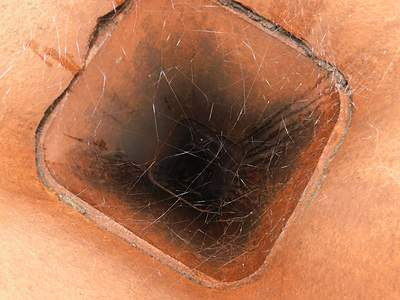
57) Missing chimney cap/spark arrestor: Lack of a raincap can result in water intrusion into the flue and deterioration of mortar, masonry materials and moisture damage. A missing spark screen increases the risk of a house fire by allowing hot embers to exit a flue.
Photo 57-1
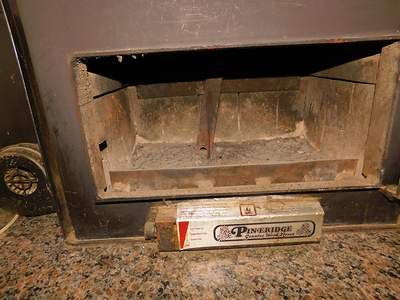
58) Wood burning device: Inspector does not light fires; therefore, no determination was made as to proper operation of the device. This is a basic visual examination of a chimney and any associated wood burning accessories. The National Fire Protection Association contends that, when a wood burning device is present, an in-depth Level 2 chimney inspection should be part of every real estate sale. I recommend following through on that suggestion: All work, and further evaluation, to be completed by licensed chimney sweep. The invasive process might reveal unidentified or latent deficiencies. For detailed information on chimney inspections, please visit: http://goo.gl/lavkcW
Photo 58-1 Limited view of the fireplace flue from the roof. Level II chimney inspection is strongly recommended at the transition of occupancy Photo 58-2 The interior of the fireplace insert appeared to have some damage. I recommend further evaluation by a chimney sweep and a level II inspection performed prior to use
Water Heater
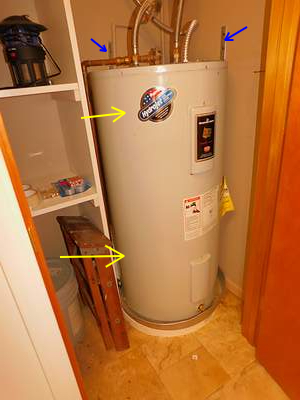
60) The water heater lacks seismic straps/bands. Therefore, the tank is vulnerable to tipping. I recommend installing seismic straps/bands, near the top and the bottom of the tank. All work to be completed by HVAC technician or plumber. A diagram, illustrative of the currently preferred method of bracing a water heater, is available here: http://goo.gl/IbE2pe
Photo 60-1 Struts (blue arrows) were installed at the top of the water heater, however better building practices recommends installing straps at upper and lower thirds of the appliance (as illustrated with yellow arrows) for more assured stability in the occurrence of a seismic event
61) Thermal expansion tank missing: In most circumstances an onsite water pressure reducer creates a "closed plumbing system." At a closed system, a thermal expansion tank will be put in place at water heater supply piping. Water expands when it is heated and backflow prevention, built into many water pressure reducers, restricts water from passing back into the main supply piping. That condition can result in unnecessary discharge from temperature pressure relief valves. A few water pressure reducers have built in bypass features that negate the need for thermal expansion tanks. I recommend further review: Qualified plumber or HVAC professional to assess pressure reducer/system and, if/as necessary, install thermal expansion vessel(s). Adding a thermal expansion tank is typically not a costly upgrade.
62) The water heater was manufactured in 2006. The anticipated useful life for a tank water heater, according to manufacturers' estimates, is 8 to 12 years. Actual lifespan will vary and, depending on corrosivity of water and other difficult to predict factors, electric tanks might outlast gas-fired tanks. Regardless, future life expectancy of this appliance and associated components cannot be determined. An aging water heater may fail unexpectedly, which can result in leakage and insufficient, or no, hot water. Due to the complications involved in dealing with a failed or leaking water heater, client(s) should consider contractor replacement of the appliance prior to more significant problems becoming apparent.
As we discussed on the site, electric water heaters tend to last longer than gas-fired water heaters, but nevertheless, due to the unpredictability of failure, I recommend budgeting for replacement in the near future.
Plumbing System & Laundry
66) The exterior dryer hood is damaged and contains an accumulation of lint. As the problem worsens, a blockage could lead to fire, or damage the thermal devices inside the dryer. I recommend replacing exterior hood, and cleaning associated ducting, now and clean as necessary in the future. Work to be completed by qualified party. To obtain additional information on dryers and ducting, please visit: http://goo.gl/B2i6QT
Photo 66-1
67) Accessible shutoff: The inspector did not identify-locate a dedicated "occupant accessible" main water shutoff valve. (This excludes any municipal, community or "street shutoff" that might have been present onsite.) Occupant accessible main water shutoffs can be situated at a number of locations. Per standard guidelines, although shutoff valves need not be conveniently located, they must be readily accessible. I suggest further review, consult with the property owner or search for a shutoff. If the building is lacking an occupant accessible shutoff valve, have a qualified plumber install a shutoff. When a main valve is not present, turning off the water at the time of an emergency, or when plumbing projects take place, will be more difficult.
In lieu of no homeowner accessible shutoff located at time of inspection, and alternate shutoff is at the municipal meter. Located at the southeast corner of the property. At the meter, the water can be shut off at the valve using a Curb-Key, this tool is sold at most hardware or plumbing supply retailers.
Shutoff valve(s) exclusion: Water supply shutoff valves, including any occupant accessible "main," municipal or street "mains," and dedicated shutoffs under/behind fixtures or appliances are not routinely operated. Only normal controls are tested such as sink and tub faucets. Prior to moving in belongings, client(s) should verify that shutoff valves are functional, readily accessible and situated at standard locations. Often, infrequently used shutoff valves are difficult to turn or they leak at valve stems. If problems become apparent, consult with plumber.
68) Inaccessible water pressure reducer. A water pressure reducing valve and associated piping and unions should be visible and accessible so, as applicable, the device can be inspected, repaired, etc. I suggest making the pressure reducer and/or fittings accessible. All work and review to be performed by qualified plumber.
Crawl Space-Foundation
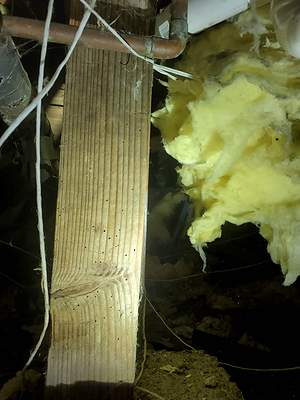
75) "Anobiid beetle" exit holes and resultant damage were noted at wood components around the crawlspace access and at visible support posts. Visual limitations existed due to the excessive amount of fallen insulation. Exit holes are tiny, so insect activity may be present at undiscovered locations. This pest works slowly over the years but, long-term, it is destructive. The species is attracted to damp substructure areas, living in wood that has 13% or higher moisture content. Poor ventilation and high humidity are conducive to sustaining an infestation. Wood that displays signs of beetle activity does not always require replacement, but it may be necessary to apply a chemical treatment. I recommend further evaluation by qualified professionals. A general contractor, knowledgeable of the biology of wood boring beetles, should locate and remove compromised (insect damaged and/or rotted) wood, put in place sound materials. If/where necessary, pull out insulation to obtain improved access and a better view. Eliminate conditions that are conducive to infestation by wood destroying insects, arrange for a pest management professional to treat the area with a legally approved chemical that controls wood boring beetles. An online video, produced by King of the House Inc., on the topic of anobiid beetles may be accessed at this link: http://youtu.be/MOhpPom3Rds
Photo 75-1 Anobiid exit holes in structural lumber at crawlspace access Photo 75-2 Anobiid exit holes in the support post the crawlspace access. The extent cannot be fully determined due to significant amount of fallen insulation
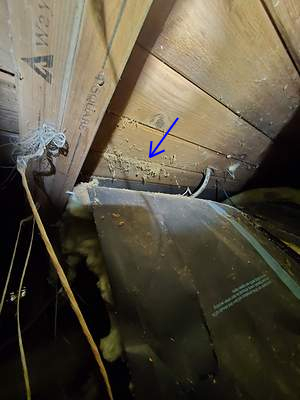
76) Signs of carpenter ants and/or resultant damage was apparent at the crawl space. Pests are often concealed, so it's seldom possible to locate all ant activity or tunneling without invasive testing. I recommend further evaluation by general contractor: Locate and remove any compromised (insect damaged and/or rotted) wood, put in place sound materials. If/where necessary, pull out insulation to obtain improved access and an unimpaired view. Eliminate conditions that are conducive to infestation by wood destroying insects. A pest management professional should evaluate the conditions and determine if chemical treatment is required. This species is opportunistic, typically more active seasonally in warm weather. An online video, produced by King of the House Inc., on the topic of carpenter ants may be accessed at this link: http://youtu.be/mJ0WeumpF9U
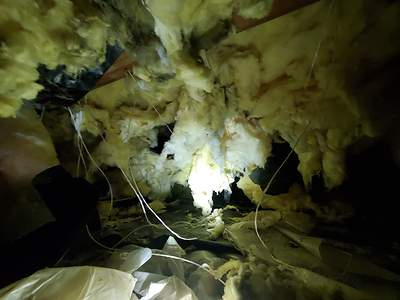
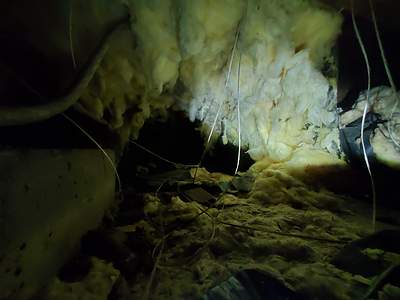
Below are examples of the evidence found. As per a conversation with the buyers agent, she was informed that a pest control treatment has recently been applied for carpenter ants. This information would explain why evidence of frass (frass a byproduct of insect tunneling) was apparent but no live ants were noted at time of inspection. However, to properly treat for wood destroying insects in substructure, insulation should be removed to a a full view and access to all components for treatment. I recommend further review once the crawlspace is cleaned out, prior to re-insulating.
Photo 76-1 Photo 76-2
Photo 76-3 In these three photos, the appearance of sawdust is assumed to be frass caused by Carpenter and activity.
77) Signs of past or present rodent activity were noted in the form of odors, droppings, seed shells, damaged insulation, traps and/or poison. Often it is not possible to determine the current status of pests. In some instances, traps and bait indicate that occupants are trying to prevent infestations. Rodents are commonly seen, often moving around from one location to another, and they can cause extensive damage. Mice and rats are able to pass through small (3/4" to 1") openings. If pests gain access to one area, they are likely to be active at other locations as well. I recommend further evaluation, consulting with a pest management professional. A qualified person should make repairs to seal openings in the structure, set traps, and clean rodent waste as necessary. Further information is available with the following guidelines in these Center for Disease Control articles: https://www.reporthost.com/?SEALUP https://www.reporthost.com/?TRAPUP https://www.reporthost.com/?CLEANUP
Photo 77-1 As a result, significant and widespread damage has occurred to crawlspace insulation Photo 77-2
78) Crawlspace vents have been intentionally blocked, many crawl space vents are at, or below, grade and have missing vent wells. When properly installed, wells keep openings into substructure space free from blockages. The present situation impedes ventilation and could allow rain or run-off water to enter substructure space. I recommend further review repair/alter accordingly onsite: Put in wells that provide separation (3"- 4") from earth to the bottom of any vent. Purchase metal or plastic wells at a home store or, a less desirable option, build wells made from pressure-treated lumber. All work to be completed by qualified party such as general contractor.
Crawl space vents are intentionally blocked. This condition restricts crawl space ventilation and is conducive to attracting wood destroying organisms. Remove plugs/covers. When/if water pipes are wrapped, vents can be left open most of the year, except during extremely cold weather. If vents are closed in frigid weather, they should be reopened immediately after cold weather subsides. When uncovering vents, confirm that screens are intact (1/8"-1/4" corrosion-resistant wire mesh) to protect against pest entry.
Photo 78-1 All foundation vents were intentionally covered, some covers were damaged and can allow vermin into the crawlspace. Vents that are at or below grade without wells can allow water into crawlspace Photo 78-2
79) Some pier block do not appear to have proper footings below. A pier block, to reduce the probability of settling or erosion, should have a poured concrete footing at the underside. I recommend further evaluation and appropriate repairs. All work to be performed by qualified party such as licensed contractor. Contractor, while onsite, to offer suggestions as to other potentially beneficial repairs or upgrades. For additional information on footing stability, please follow this link: http://goo.gl/c1bF6t
Photo 79-1 An example of less than professional installation. Support posts should have positive attachment at the beam, post should be centered on lower bracket and proper nails installed and pier block should be dug to undisturbed soil
80) INACCESSIBLE LOCATIONS: The scope of the inspection is limited. Large portions of the space areas are inaccessible or difficult to access due to excessive amounts of fallen insulation and other debris. Washington law requires a structural pest inspector to report that inaccessible substructure space is vulnerable to concealed problems, including structural damage, rot and wood destroying insects. Accessible is defined as at least 12" of space between earth and beams and a minimum 18" of space between earth and joists. Earth, when closer to wood than those recommended clearances, restricts access and the condition is conducive to attracting wood destroying organisms. Piping and ductwork can contribute to tight clearances, diminish air movement-ventilation, and further limit access. Unless it is impossible or impractical to do so, inspector is obligated to call for making any inaccessible substructure areas fully accessible. I recommend further evaluation and repairs/modifications: Establish sufficient clearances from wood to earth and, as applicable, under any piping or ductwork. All work to be performed by qualified and experienced general contractor. If/when excavation takes place, the work must not compromise foundation, footings or pier blocks. Once inaccessible areas have been opened up, contact inspector and arrange to have all parts of the substructure space assessed. Or, at client's discretion, when onsite repairs commence, have a licensed general contractor locate and correct any substructure issues that might become apparent.
Interior Areas
88) Emergency escape & rescue openings: Current requirements, related to secondary EGRESS, are onerous and complicated compared to the standards of years gone by. At this time, protocols allow quick egress for residents and provide ready ingress for firefighters and their safety apparatus. Based on standard recommendations, bedroom windows are too high off the floor to provide adequate emergency egress-ingress. Inspector is not a code enforcement official, nor verifying compliance with past-present codes. Codes are not retroactive, but fire safety is of importance. I recommend further evaluation, establishing sufficient egress at any bedrooms or rooms that will be used, even on an occasional basis, as sleeping areas. Client(s) should discuss repair options with a general contractor. A diagram, illustrative of recommended egress window sizing and height guidelines, is available at this link: https://goo.gl/QM2nqH
The following standards currently apply to bedrooms:
- On the interior side, if the window is 44" or less off the floor (maximum height to opening allowed) the net clear space requirement is, minimum, 5.7 sq ft. The minimum window opening (height) must be 24" and the minimum opening (width) must be 20". A window, if the dimensions are of minimum height and width, will not comply with the overall size requirements for net clear space. Therefore, at least one of these dimensions must, significantly so, exceed the minimum specifications - At grade floor exits, defined as windows a maximum of 44" over both interior floors AND grade/landing at the exterior, require a net clear space no smaller than 5.0 sq ft. The minimum window opening (height) must be 24" and the minimum opening (width) must be 20". See the reference to windows that are of minimum dimensions, explained directly above. - Windows should be installed with the bottom of the window opening no higher than 44" off the floor. (When the opening is higher than suggested, often a window seat, a stair or a similar permanent object, can be installed under the window to effectively decrease height above the floor) - Windows, or doors, designed for emergency egress, must easily open from the inside, with no keys or tools required. Any storm windows must be of sufficient size, readily open and not restrict egress - A door to the outside may, depending on location, provide secondary egress
89) Toilet(s) inspection: At time of inspection elevated moisture readings were noted around the base of the toilet in comparison to assumed dry areas. I recommend qualified plumber pull toilet, inspect surrounding area, if damage is noted to the floor than repair should be performed prior to reinstalling a new wax ring in securing the toilet to the floor. Caulking has deteriorated around the base of the toilet. Preferably, an installer will seal the front and sides of a toilet but leave a gap of a few inches at the back. The seal protects against moisture entry and is, also, hygienic in nature. The back of a fixture is left open so, if the wax ring-seal (under a toilet) leaks, a resident will be more likely to detect seepage and seek professional assistance. I recommend further evaluation, and appropriate repairs, with work to be completed by a qualified plumber.
Inspection procedure: Inspector looks for signs of past, or possibly present, leaks or seepage. A non-invasive moisture meter may be employed to check flooring at bases of toilets. Regardless, a slow, intermittent or concealed leak could be undetectable at the time of inspection. Minor deficiencies at toilets can result in interior damage. Depending on belongings present and flush mechanism attachment, inspector might not remove tank lids. Caulking or grout, around bases of toilets, requires periodic maintenance and eventual replacement.
Photo 89-1 Elevated moisture around the base of the toilet compared to single digit moisture readings at other sections of the bathroom floor
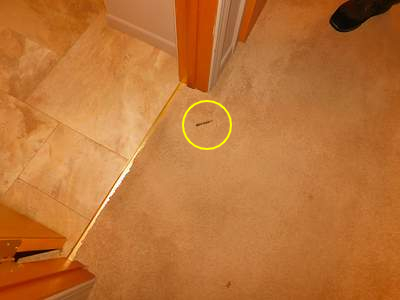
90) Carpeting is damaged in various areas. I recommend that a qualified contractor replace as necessary.
Photo 90-1 This is just one photo of the type of damage noted to the carpet in various areas. Most significant damage is in the living room. Carpet appears to be newer, damage is sporadic
91) Consumer alarms: Smoke alarms(s) were present, but inspector did not identify/locate carbon monoxide (CO) alarm(s). Sometimes dual CO/smoke alarms (both features built into combination units) might be present but go unidentified. By law in Washington, at the time of a real estate sale, an approved CO alarm is required outside or, if necessary to provide sufficient coverage, inside each separate sleeping area and (as applicable) on each floor level. Working smoke alarms, per general safety guidelines, should be put in each bedroom, any adjoining hallways, at every floor level and at enclosed interior staircases that lead to other occupied levels. Today's consumer alarms are inexpensive and, in the case of battery powered devices and those that plug-in, they can be installed by almost anyone. An inspector does not routinely test, count, or determine that an operable alarm is situated in every required location. Prior to assuming occupancy, clients should further assess alarms. If necessary, add/reposition/upgrade alarms so as to comply with state law and all prevailing safety protocols. All consumer alarms must be installed per manufacturers' specifications. Residents are advised to regularly test alarms, change batteries as needed, and replace any old or nonoperational alarms (10 years is the maximum estimated design life). Some fire safety professionals suggest that all smoke alarms should be of the photoelectric type vs. commonly seen ionization alarms that can be slow to react to smoke and fire.