This report published on Tuesday, October 30, 2018 5:07:39 PM PDT
King of the House, Inc Steven L. Smith, President Washington State Licensed Home Inspector #207 Washington State Licensed Structural Pest Inspector #69078
Thank you for using King of the House, Inc. for your home inspection. I know your home inspection is very important to you. And your business is very important to me. If I can help in anyway after the inspection, please call or Email me at the Email address or telephone number provided on this report. And, if you are happy with King of the House, Inc. please refer my company to your friends, your realtor and anyone you believe could benefit from my services. King of the House, Inc. not only performs inspections for purchasers, but also for people planning to sell a home who wish to estimate the amount of work that needs to be completed before listing the house.
A home inspection is a visual, and not an exhaustive or invasive, inspection of a home by a trained and impartial inspector. Your King of the House inspection adheres to the standards of the practice of the state of Washington.
Steven L. Smith is the lead instructor for the state approved Fundamentals ofl Home Inspection Training Program taught by Bellingham Technical College, an accredited state college. Smith has, also, been appointed by the Governor to serve on the Washington State Home Inspector Licensing Board.
This report includes an inspection for wood destroying organisms (WDO'S). More detailed information on this topic, and a suggestion as to how to more effectively use Form 17, the Real Property Transfer Disclosure Statement, is provided under general information.
Every King of the House, Inc. report includes photos and descriptions detailing the locations of areas of concern as noted by the inspector. Despite the photos and specific information provided, if during this inspection wood destroying organisms or conditions conducive to wood destroying organisms were found, I want you to know: WAC 16-228-2045 REQUIRES THAT A DIAGRAM BE PREPARED FOR WDO INSPECTION REPORTS. A COPY IS AVAILABLE UPON REQUEST.
SUMMARY: NEAR THE TOP OF THE REPORT, LEFT CORNER, CLICK ON "VIEW SUMMARY". THIS SUMMARY WILL IDENTIFY THE MOST SIGNIFICANT ONSITE ISSUES.
How to Read this Report
This report is organized by the property's functional areas. Within each functional area, descriptive information is listed first and is shown in bold type. Items of concern follow descriptive information.
Concerns are shown and sorted according to these types:
Cautionary
Safety concern
Replace-Repair
Replace or repair
Repair-Maintain
Repair and maintain over time
Review-Evaluate
Professional to review, service, repair, replace or, as applicable, client(s) to evaluate information and determine personal level of concern
Maintenance-Service (repair)
Maintain, service or repair
Monitor-Status check
Periodically verify/observe the condition or, as applicable, confirm performance of system-components
Onsite notes
Onsite observations and suggestions
Informational
Background-informational comment
Damage
Deterioration, damage or rot as a result of weather exposure or wood destroying organisms
Conducive conditions
A condition that may attract wood destroying organisms (Wood-soil contact, water leaks, etc.)
Click here for a glossary of building construction terms.Contact your inspector If there are terms that you do not understand, or visit the glossary of construction terms at https://www.reporthost.com/glossary.asp
Inspection overview: This is a visual inspection performed to meet with the Washington Standards of Practice and applicable state guidelines. Limitations and exclusions are described in the inspection contract and the written report. Issues, concerns or recommendations have been referenced in appropriate sections of the report. *Clickable hyperlinks make it possible for clients to navigate to photos, videos and additional information.
*Clickable links are operational if a report is accessed from an "online" computer: Lesser operating systems in Smartphones may not support full functionality. If reports are saved and viewed in PDF format, access to hyperlinks will be restricted as a result of limitations in Adobe software.
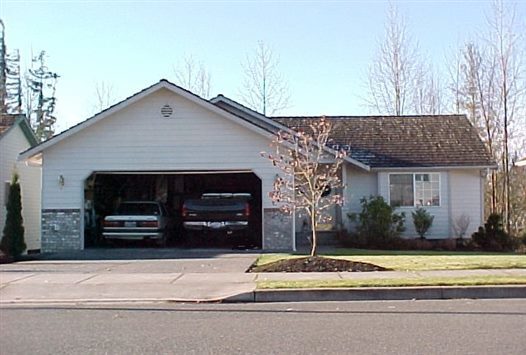
Structures inspected: Home and attached garage
Time started: 9:00AM
Time finished: 1:30PM
Present during inspection: Client, Realtor
Occupied: Yes
Age of building: 10 years
Type of building: Single family
Weather conditions: Rain, showers
Temperature: Cool
Ground condition: Damp
Main entrance faces: West
Foundation type: Walk-in crawl space
The following components, systems or structures are beyond the standards of a home inspection and, as they may apply, are excluded from this inspection: Low voltage outdoor lighting and controls, Water filtration system, aerator or water softener, Security system, built-in sound system or intercom, Fences, Telephone and cable systems,
1) Furnished home limitations: This home is furnished; therefore, numerous wall, floor and or ceiling surfaces were obscured by furniture and other items, limiting the inspection of some areas.
2) Form 17/Limitations: Form 17 is a required disclosure statement at all real estate transactions conducted in the State of Washington. King of the House, Inc. encourages you to read Form 17, as it is frequently not provided to the home inspector. This crucial disclosure consists of about eighty questions pertaining to the home. By law, a seller is required to disclose on this form many details about the home and property, which may or may not be observable at the time of inspection. For example, the seller's disclosure could reveal hidden but known defects in materials or products used in construction of the home; well or water supply problems; known health or environmental concerns such as mold, underground fuel storage tanks, chemical pollutants, or a history of seasonal water, flooding, pest infestations or fire damage, etc.
3) Professional qualifications of workers: In most reports, I recommend that upgrades or repair work be performed by a "qualified person" or "qualified parties". I consider qualified parties, in the licensed trades and professions, to be those individuals who hold the necessary state or local licenses or permits to legally work in their field -- licensed electricians, licensed pest control applicators, licensed plumbers, licensed HVAC technicians, licensed engineers, licensed general contractors, licensed building architects, licensed landscape architects, etc. In instances where repair work may be legally done by an unlicensed party, it is my recommendation that the repair person be, based on past training, experience or expertise, "qualified" to complete the job at hand and to, at that time, also be capable of further evaluating the situation and making further recommendations and completing any related repairs or upgrades. Any work performed by licensed and/or qualified parties should include, as is required, obtaining permits from the state, the county or the city.
4) Wood Destroying Organisms: This report conforms to the standards of practice for home inspection and it conforms to Washington State Department of Agriculture (WSDA) rules which regulate structural pest inspections.
This is a complete wood destroying organism (WDO) inspection -- a good faith effort on the part of the inspector to report visual signs of wood decay fungi and wood destroying insects. Additionally, "conducive conditions", deficiencies defined by the state that can contribute to the likelihood of WDO infestations, will be reported. The WSDA inspection control number, assigned to this home, is at the top of the report above the client's name.
Exterior human exit door(s): Metal (front); Vinyl clad sliding door (back)
Exterior window type and/or material: Double pane, vinyl
Driveway material: Concrete exposed aggregate
Sidewalk material: Concrete exposed aggregate
Gutter & downspout material: Aluminum
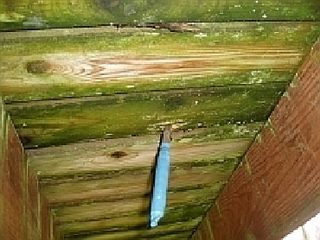
5) Balcony/deck: Guardrails at the high wood back deck are wobbly and unstable. Positive connections are missing at the tops of the high columns that provide critical support. Wood decay (rot) was evident at joists and wood decking. A cross brace, that runs between the columns, has decayed. There is no metal flashing where the balcony meets the side of the house -- conducive to moisture seepage into the exterior wall. I recommend further evaluation, and appropriate repairs, with all work and safety upgrades to be performed by a licensed contractor. When job is complete, refinish the structure with a preservative/sealant to protect against moisture penetration. A short video, produced by King of the House Inc., on the topic of rot or wood decay fungi may be accessed at this link: http://youtu.be/6p8q1Pa1H_U
Photo 5-1 Underside decking boards, decay
6) The high back balcony/deck is not positively anchored to the building. A ledger board should be attached with lag screws/bolts or other approved fasteners. The fasteners would be driven into framing and staggered across the ledger board. Lag screws are less subject to withdrawal than nails and they better resist lateral and vertical forces. Suitable fasteners should be installed at the ledger board to protect against pull-away of the deck from the exterior wall. I recommend further evaluation, and appropriate repairs, with work to be completed by a general contractor.
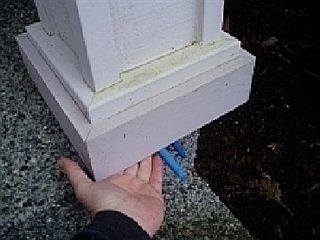
7) The column that holds up the front porch roof, due to settling of the porch slab below, is no longer supported. It no longer has bearing. The slab has sunk 1 1/2" to 2" at this side. This is a structural issue that has led to sag of the roof. I recommend further assessment, and appropriate repair, with work to be performed by a qualified party such as a concrete/paving contractor.
Photo 7-1 Gap under column, porch settled
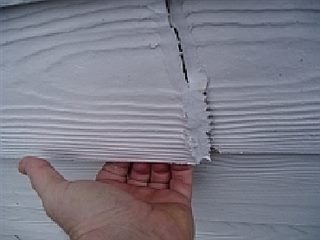
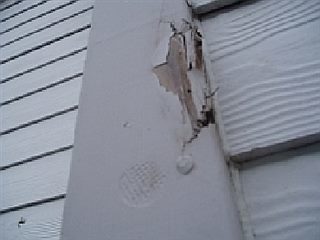
8) The fiber cement lap siding is loose, insufficiently and incorrectly attached: Butt ends are too tight together, a condition that does not allow for seasonal expansion and contraction. I recommend further evaluation, and repairs, with work to be completed by a general contractor. This manufacturer produced video explains how to install fiber cement siding: http://youtu.be/5Qwax7d9O_k
Photo 8-1 Not securely fastened, improper caulking
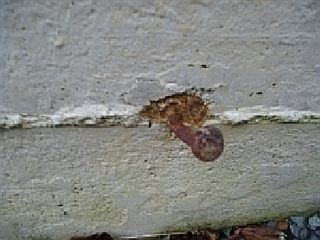
9) Wood trim, at some locations, has decayed (rotted). This includes trim at the south end, near the exhaust hood from the gas fireplace. Also, there is fascia decay at the south end of the downspout in front. Under the deck, at the S/E corner, there is decayed trim. I recommend further review by licensed contractor: Locate and remove decayed materials, replace them with sound wood and eliminate all conducive conditions. When repairs are complete, as might be necessary onsite, caulk and paint exterior components.
Photo 9-1 South side
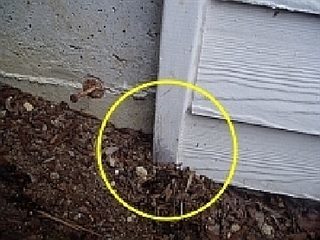
10) Soil is against siding and wood trim at a number of locations. Soil against wood leads to decay (rot). I recommend removing soil from contact with structure and grading earth at a slope ratio of 1" per foot, for at least 6 feet out from the building, so water is directed away from the structure. It is not always attainable, but try to establish at least 6" of clearance between wood and soil. Work to be completed by qualified party.
Photo 10-1 South side, soil to siding and wood trim
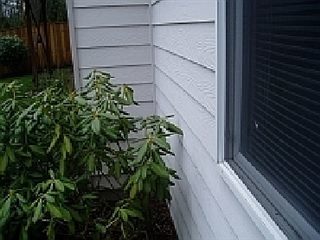
11) Vegetation (plants, trees, shrubs, vines) is in contact with building's exterior. I recommend cutting back vegetation so at least a 2 " gap is maintained (more is better) between plants and the exterior. A sufficient gap allows building materials to dry quickly after it rains, and a gap eliminates easy pathways that are attractive to wood destroying insects. A video, descriptive of other commonly seen conditions that are conducive to rot, is available here: http://goo.gl/CPMASl
Photo 11-1
12) Paint is peeling or otherwise failing at some areas of the siding and the trim. I recommend having a qualified painting contractor prep (scrape, sand, prime and caulk) and repaint where necessary. For detailed information on applying exterior preservatives, please visit: http://www.reporthost.com/?PAINT
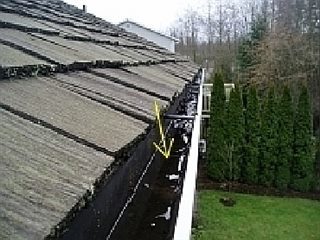
13) Gutters contain leaves/debris and they are not draining. Uncontrolled run-off water is a conducive to damaging building materials or attracting wood destroying organisms. I recommend cleaning and maintaining all gutters and downspouts now and as is required in the future. Work should be performed by a qualified party who can safely complete the job.
Photo 13-1
14) Doors: Weatherstripping at bottom, exterior and inside, of the front entry door is damaged and moisture can enter under the door. I recommend further review, and repairs as might be necessary, by qualified contractor.
15) Metal snap-ties that were used in pouring the concrete foundation are still in place at the exterior. Metal ties, extending out from the concrete, can result in personal injury: scrapes or cuts. Ties can be broken off with suitable tools such as a hammer, pliers or vice-grips. After ties have been removed, cover any holes in concrete with patching mortar. A video of a general contractor, demonstrating one way to quickly remove a snap-tie, is available here: https://youtu.be/LL-bYG7DzkA
Photo 15-1
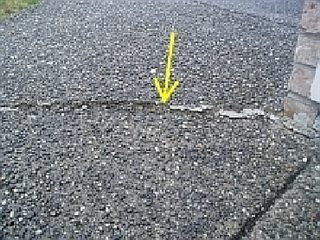
16) The sidewalk is cracked near the corner of the garage and, due to variations in the surface height, the crack may pose a trip hazard. I recommend that clients review condition of pavement and, if concerned, consult with a qualified concrete contractor.
Garage vehicle door operation (motorized/manual): Powered: Failed to auto-reverse, safety issue
Garage vehicle door sensor-eyes: Functional
17) There is a breach in the fire-resistance between the garage and the dwelling. A fire in the garage could be "drawn" into the attic that extends over the home. A proper garage interior has no openings, gaps or holes in drywall that could allow a fire in the garage to spread to wood framing. When the garage is empty, no vehicles and storage, I recommend repair of the deficiencies in the fire-resistance so the garage complies with all of the established safety guidelines. Further evaluation and work to be completed by a qualified contractor. An informational video, produced by King of the House Inc., on the topic of garage fire-resistance may be accessed at this link: http://youtu.be/zmyjT5hd87E
18) The motorized garage vehicle door stops and then "auto-reverses" on impact, but it requires too much force, hard impact, before the door reverses. The door should, upon striking an object, begin to reverse/fully reverse. Even if electronic sensor eyes are installed and functional, failure to auto-reverse is a safety concern -- especially so for children or pets. I recommend that a garage door contractor repair/replace and further evaluate door and mechanism. Three basic safety evaluations are commonly performed at motorized garage vehicle doors: (1) floor test, (2) mid-height test, (3) sensor eyes test. An article that better explains the testing procedures employed may be accessed at this link: http://goo.gl/UTsWis
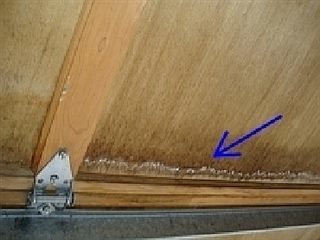
19) The wood panel overhead vehicle door has been exposed to heavy moisture and decay (rot) is present, both inside and at the exterior. I recommend having a garage door professional replace the door. Alternatively, clients could clean it, scrape it, patch it and re-finish it in an attempt to gain some additional life from the door.
Photo 19-1 Moisture, decay
20) The manufactured stone wainscot, sides of the vehicle door, is too close to the paving, an installation deficiency that could result in moisture being trapped behind stone. Standard installation guidelines specify installing weep screed and terminating the bottom side of the stone 2" above paving or 4" above earth/grade. I recommend repairs, further review with work to be completed by a qualified contractor. To see a diagram, illustrative of standard and recommended clearances to stone-masonry materials, please follow this link: https://goo.gl/jlqmLc
21) The garage inspection is very limited in scope, with many areas excluded due to lack of access and visibility, due to stored items, parked automobiles, tools, etc.
Roof ventilation system(s) based on exterior/roof view: Skip-sheathing, Soffit venting, Gable vent at attached garage
Roof inspection method: Viewed from eaves while standing on a ladder
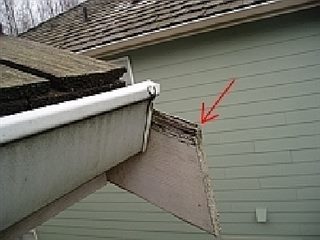
22) At several locations, lumber (rafter tails-fascia/trim) up at the roofline, has decayed-rotted. Qualified party such as general contractor or roofer to correct/repair by locating and removing any deteriorated wood and replacing it with sound materials. On a case by case basis, install or improve upon flashings -- so they direct runoff water from the roof over the rafter tails or fascia. Flashings, typically cut from shingles or metal, should extend approximately 2" over any tails. A photo of two rafters, one with a flashing and the other without, may be accessed at this link: http://goo.gl/XV9z0F
Photo 22-1 S/W corner, decay No shingle flashing above
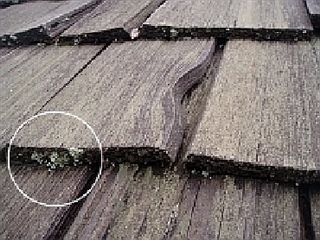
23) Lichen and moss are growing on the shakes in some locations such as at the front. Shakes are natural products that can weather and rot. This roof is in need of professional cleaning and it is at a point where, if it does not receive attention, it will degrade and rot. Therefore, I recommend that a qualified roofer, who has experience with wood roofs, further review and clean the roof. At that time, complete any repairs such as replacing curled or split shakes and, as applicable, apply preservative treatment to roof surface.
Photo 23-1 Moss and algae
24) The roof/wall flashing over the small roof, at the east, is improperly installed at the top. The flashing should go under and behind the siding. At the south edge the metal extends out from underneath the siding. If water gets behind that flashing, it could cause damage at the exterior wall. I recommend further review by roofing professional: Adjust/repair the flashing.
25) Significant amounts of organic debris (leaves, needles, etc.) has collected on the roof. This keeps any sloped roof from properly shedding water and drying. I recommend cleaning debris off the roof at this time and, as might be necessary, in the future. Work to be completed by a qualified party such as a roofing contractor.
26) When it is possible to do so, safely and without damage to roofing materials or components, a home inspector will traverse the roof. Due to the slick condition of this roof, algae and moss, this roof was not traversed because, in the inspector's opinion, trying to do so would be hazardous to the health and safety of the inspector. This is a necessary limitation to the inspection and the inspector viewed the roof, while standing on a ladder, at the eaves.
Insulation estimated R value (today installed to R-49 minimum over living/conditioned space): R-38+
Insulation over living space: Yes
Insulation over garage (not required): No, typical and acceptable
Roof ventilation system(s): See "roof" section of the report
Cardboard baffles visible at soffit: Yes, protects against insulation blocking soffit vents
Attic humid/musty: No
Attic excessively hot: No
Stains on attic sheathing: No
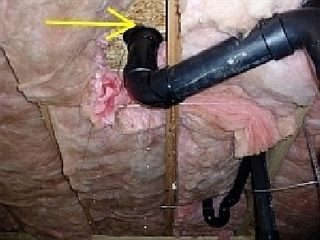
27) The insulation in this attic is resting around the metal B-vent from the furnace. A B-vent can achieve temperatures of 300 degrees when gas appliances are operating. The vent should be, minimum, 1" away from flammables including insulation. I recommend removing insulation directly around the vent and installing, in most instances, a sheet metal shield that separates the vent from insulation. Any work, further review of vent(s), to be completed by qualified party such as an HVAC professional. For more information on combustible clearances, please visit: http://goo.gl/2c7Plb
Photo 27-1
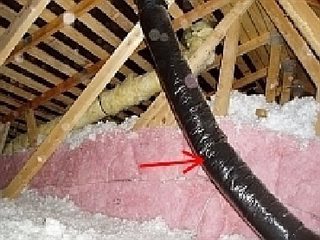
28) A flex duct, from west bath to outdoors, has inadequate support. This makes it likely that the duct will, eventually, come loose and vent moisture into the attic. Flex-duct should be supported every 5' or less. I recommend providing proper support, work to be completed by capable party.
Photo 28-1
29) When it is feasible to do so, an inspector will traverse the attic. If, in the inspector's opinion, doing so could be hazardous to the inspector or damage components in the home, the attic will not be traversed. At this home the attic does not have a floor over the ceiling structure and insulation obscures the ceiling structure. The attic is not safe to traverse at some locations because there is the risk that an inspector might step off a structural member and damage the ceiling below. Furthermore, it is undesirable to compress insulation. Therefore, following those established guidelines, this attic was partially traversed. It was viewed from the access hatch and from the area just up inside the hatch. Some locations are excluded from view. That is a necessary limitation to the inspection.
30) Skip-sheathing: Ventilation includes spaced plank or "skip-sheathing." With skip-sheathing, boards or planks (installed with spaces between boards) will be visible in the attic. The design allows the roof to dry from below. The installation may include felts or underlayments, most commonly seen with shake roofs. A schematic drawing of a common method of skip-sheathing is available at this link: http://goo.gl/r06EGN
31) Manufactured trusses, present here, are designed by structural engineers. Therefore, a home inspector does not question the truss design but views components to determine if webs or chords have been cut or modified. No defects noted.
Primary service overload protection type: Circuit breakers
Main service panel make: Bryant
Location of main disconnect: Breaker at top of main panel
Location of main service panel: North wall of garage
Main disconnect rating (amps): 200
Theoretical service voltage (volts): 120-240
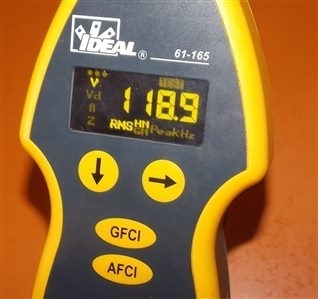
Actual on-site service voltage read at 120V circuit (calculated at 240V circuit): 119-238
Service conductor material: Aluminum, standard and acceptable
Earth grounding electrode verified: Yes
Branch circuit wiring type: Non-metallic sheathed
Solid strand aluminum branch circuit wiring present: No
AFCI breakers (protection against fires in bedrooms) installed: No, recommended at bedroom receptacles and lights
GFCI protected receptacles (protection against shocks in damp areas) installed: Yes
GFCI protected receptacles operational: Yes
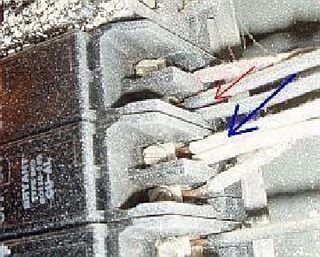
32) Double-tapping is present at two terminals in the main breaker panel. These breakers appear to be designed to accommodate only one wire under the lug. (UL) Underwriters Laboratories has identified this as a safety hazard since the conductors are likely to loosen which could lead to safety issues. In related matters, the inside of the panel has been painted and some wires require re-identification. When wires with white sheathing are serving as hot conductors, they should be marked with black or red tape or paint. I recommend that a licensed electrician further evaluate the panel, wiring/connections and repair as might be necessary.
Photo 32-1 Double-taps and painted breakers
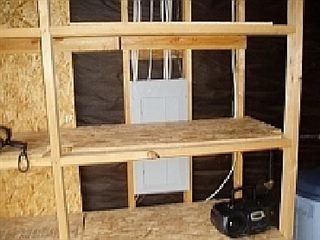
33) Inadequate access/clearance exists at the main service panel. This panel has a storage shelf in front of it. While the inspector did take the screws out of the shelf, and remove the panel cover, this location does not meet minimum accessibility guidelines. A panel, to be considered accessible, must have:
- An open area, minimum 30" wide x 3 ft deep at the front, and panel not located on or over a stairway - A minimum 6 ft-3" of headroom in front - Walls, below the panel, unencumbered clear down to the floor-ground - Center of the grip of the operating handle of the switch or circuit breaker not more than 6 ft 7" above the floor or a working platform
To view a diagram that better illustrates recommended panel clearances, please follow this link: http://goo.gl/cyBUKn
Photo 33-1
34) Closet lighting: An exposed, uncovered, light fixture/bulb was apparent in the master bedroom clothes closet. Any incandescent light fixtures must be approved for closet use and have covers that fully enclose bulbs -- so energized lighting (hot) cannot come in contact with flammables. I recommend repair/replacement, properly covering, any such fixtures. Work, if it involves rewiring or changing fixtures, to be completed by a qualified electrician.
35) In the kitchen, the island countertop is missing an electrical receptacle (outlet). To reduce the probability of occupants running appliance cords across pathways where people walk, specific installation guidelines apply to kitchen countertop receptacles. Licensed electrician to review and install receptacle. A diagram (clarification of today's requirements as to the placement of suggested kitchen countertop receptacles) is available at this link: https://goo.gl/6rqLYO
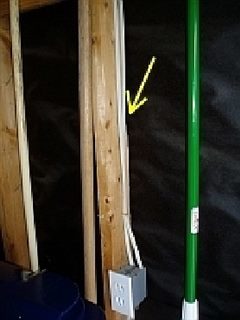
36) Unprotected, surface-run, non-metallic sheathed wiring is visible in garage wall cavities. This soft insulation is vulnerable to nicks and damage from common tools. I recommend that the exposed cables be properly protected/covered by completing the drywall job. Alternatively, they could be protected by running the wires in proper conduit. Work to be completed by qualified professional.
Photo 36-1
37) The devices were not standard when the home was built, but client should consider an upgrade to "Arc fault" or AFCI breakers for the bedroom circuits. These devices, which would be installed in the electrical panel, are not costly and reduce the risk of a fire by protecting against overheating or arcing of receptacles (outlets) or light fixtures in bedrooms. I recommend that all electrical work be done by a qualified party such as a licensed electrician.
38) I operated or tested a representative number of wall switches and receptacles. The inspector operates or checks a number of switches and receptacles but there is not a detailed analysis of the performance of three-way switches or switched receptacles. No defects were noted.
Estimated age: Original to home, 10 years per serial number
Capacity (in gallons): 40
Water temperature degrees Fahrenheit (keep at/under 120 degrees to reduce the chances of scalding burns): 130 degrees F
Seismic bracing in place: Yes
Water shutoff valve: Yes
Flexible gas line connectors: Yes
Fuel/gas shutoff valve at heating appliance: Yes
Gas water heater elevated at least 18" over garage floor: Yes
Flame viewed at burner on gas/propane-fired water heater: Yes, no defects noted
Temperature pressure relief valve: Yes
Temperature pressure relief valve drain line: Yes
Temperature pressure relief valve drain line termination point visible: Yes, but qualified party to modify so the termination point conforms to standard plumbing guidelines
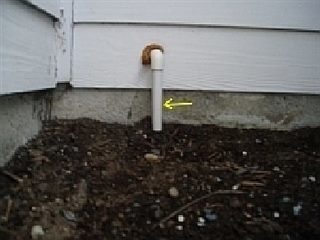
40) The temperature pressure relief valve drain line is below grade, buried in the dirt -- impedes flow and is a safety concern. The tubing should terminate 6" to 24" above grade. I recommend immediate repair (trimming drain line) and further evaluation by a qualified plumbing contractor. To see a short video on this topic, produced by King of the House Home Inspection, please visit: http://youtu.be/iwCfEWvzYds
Photo 40-1 Below grade
41) The hot water temperature at fixtures reads as a minimum of 130 degrees Fahrenheit. The risk of scalding increases when water temperature exceeds 120 degrees. Adjust or modify system so as to establish, at fixtures, a maximum water temperature of 120 degrees. Water temperature is regulated at this gas water heater by a thermostatic control at the front bottom of the tank. Temperature can fluctuate between fixtures and it is somewhat dependent on when the tank last heated water. Although the temperature at fixtures should be limited to 120 degrees, maintaining a higher water temperature inside a tank is advisable: lesser probability of bacterial growth, hotter water to washing machines and dishwashers. Therefore, a preferred means of adjusting water temperature involves installing a thermal mixing valve in the system -- water heater could run at a higher temperature (typically 130-140 degree range), yet water at fixtures would be limited to 120 degrees. At client’s discretion, choose to adjust thermostat(s) or have a thermal mixing valve put into system. Any work to be completed by qualified party such as plumber. To obtain more information on hot water safety, please visit: http://goo.gl/IS7knJ
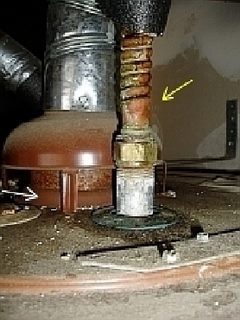
42) This water heater has extensive rust at the draft hood/flue and steel nipples have been, improperly so, used in the water supply and outlet lines. As a result of the dis-similar metals being in contact, galvanic action has taken place and there is significant corrosion at the fittings. This water heater is 10 years of age, estimated design life of a water heater is 8 to 12 years. In light of rust and the overall condition of the tank, I recommend further assessment and repairs or replacement, with work to be completed by a qualified plumbing contractor.
Heat system type(s): Forced air furnace; Electric, fan assisted, toe-kick unit in kitchen
Make of furnace: Consolidated
Model number: HCC1009D5RX
Estimated age: Original to home,11 years since manufacture per serial number
Flexible gas line connectors: Yes
Fuel/gas shutoff valve at heating appliance: Yes
Gas heating appliance elevated at least 18" over garage floor: Yes
Automatic house ventilation system: No
Heat distribution system: Flexible ducts
Furnace filter location: Inside front cover
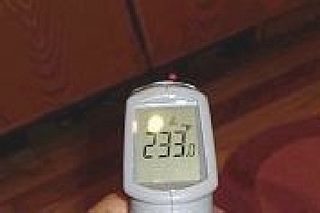
43) Supplemental heat in the kitchen is provided by a fan-assisted wall heater. The lower edge of the heater is mounted below the hardwood floor. The heater, at the time of the inspection, was putting out temperatures as high as 240 degrees. Wood typically can ignite at 450 degrees; however, wood continually exposed to high temperatures over a long period of time is altered (pyrolysis) so it is susceptible to igniting at lower temperatures. I recommend repair/replacement/further evaluation by a qualified party such as a licensed electrician.
Photo 43-1 Temperature reading at floor and electric heater
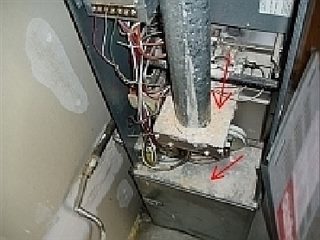
44) This furnace has an accumulation of white condensate on the interior, a sign that it requires service. This unit is 11 years of age. Forced-air furnaces have a life expectancy of 15-20 years. But, to maintain and extend the life of the appliance and for safety, manufacturers recommend that these systems be professionally cleaned and serviced by an HVAC professional annually. I recommend that an HVAC professional service the unit at this time. A heating contractor produced video, descriptive of the procedures and tests customarily included as part of HVAC service at a gas furnace, is available at this link: http://youtu.be/IOMcABp5HDE
Photo 44-1 Cover off, heavy condensate
45) An infrared thermometer was employed to test accessible heat supply registers. Those ducts that I could readily access were, properly so, supplying heat.
Location of main water shutoff valve: Garage, N/W corner
Water service: Public
Water pressure reducer in system: Yes
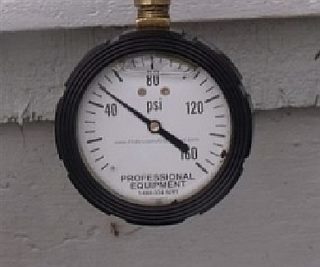
Water pressure (normal is 40 to 80 psi): 50
Service pipe material: PVC where visible
Supply pipe material: CPVC
Vent pipe material: Plastic
Drain/waste pipe material: Plastic
Location of apparent cleanout(s): Various locations visible inside/substructure at drain piping
Plumbing vent stack(s) present: Yes, some homes have multiple vents, some have a single stack. The inspector verifies a vent(s), but does not perform detailed analysis of the adequacy of vents
Water shutoff valves for sink(s): Yes
Proper P-traps present at sinks: Yes
Water shutoff valves for toilet(s): Yes
Shutoff valve for dishwasher: Yes
Visible air-gap anti-backflow device at dishwasher: Yes, proper
46) The clothes dryer is ducted into foil-mylar accordion-type flex duct and the duct was routed through the floor -- down into the crawl space and then to the outside. Ducting that goes through walls, into substructure areas/crawl spaces, must be rigid metal ducting. That ducting should be wrapped with R-4 insulation in unconditioned spaces. Semi-rigid aluminum flex duct (different than plastic or foil accordion flex duct) would be acceptable as a short transition section of ducting behind the dryer. All work/repair to be completed, in a manner that complies with general safety guidelines, by qualified person such as appliance installation professional. For more information on dryers and ducting, please visit: http://goo.gl/B2i6QT
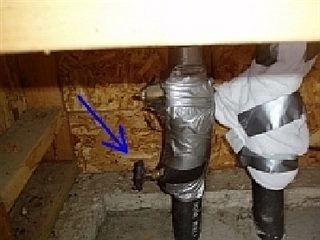
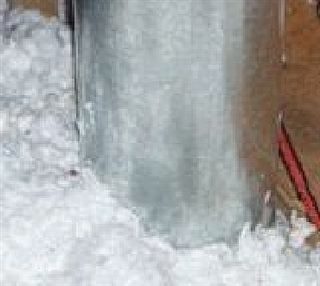
47) Main water shutoff valve and water pipes in garage at N/W corner are wrapped with towels and other temporary, and deficient, insulation. I recommend properly wrapping pipes to prevent freezing in cold weather.
Photo 47-1 Main water shutoff valve
48) Shutoff valve exclusions: Water shutoff valves, including the "main" and any such valves at sinks, toilets, dishwashers, washing machines, water heaters are never routinely operated by a home inspector. Only normal controls are tested for functionality. I recommend that client(s) verify, prior to moving in large amounts of storage or belongings, that all shutoffs are fully functional, properly located and easily accessible at standard and critical areas. It is not uncommon to find that shutoff valves are difficult to operate or they may have leaks around the valve stems when operated. This problem, when present, can often be corrected by tightening the appropriate part of the valve. Regardless, if problems are noted or plumbing work is required, consult with a plumber.
49) Washing machine and dryer were not inspected. Realtor said they were not part of the purchase. Laundry area is plumbed and there is wiring for a 240 volt electric dryer. There is no gas connection for a gas dryer at this time.
50) Water pressure is in the normal range, 50 PSI.
Brand name of gas fireplace: Canadian Heating Products
Visible gas shutoff(s): Yes
Wood burning fireplace: Metal and masonry
51) The gas fireplace, despite the gas and pilot light both being on, did not operate or turn on with normal controls at the time of the inspection. I recommend repair and service with work to be completed by an HVAC professional. Then, in the future, if the unit is used only occasionally primarily for aesthetics or ambiance, heating professionals recommend that it be serviced about every three years. If it is being used heavily, as a primary heat source, it should be serviced annually, as if it were a furnace. These units, like furnaces, last longer, are more efficient and safer when regularly maintained by heating professionals.
52) The wood burning fireplace is rusty on the inside. Over time, rust can cause deterioration of, or holes in, metal. The inspector does not light fires or operate dampers which tend to be covered with soot. This is a basic visual examination of a chimney and any associated wood burning device. The National Fire Protection Association has stated that an in-depth Level 2 chimney inspection should be part of every sale or transfer of property with a wood burning device. The Level 2 inspection might reveal defects that were not apparent to the inspector who is a generalist. I recommend repair and further evaluation, Level 2 inspection, with work to be completed by a qualified chimney sweep. For detailed information on chimney inspections, please visit: http://goo.gl/lavkcW
Insulation material (type) underneath floor above: Fiberglass roll or batt (Typically R-11 to R-19)
Vapor barrier backing on insulation installed properly: Yes
Crawl space design/venting: Unconditioned (ventilated) space
Foundation vents in crawl space open: Yes, should be kept open except in extreme cold
Water supply pipes wrapped: Yes
Vapor barrier present over earth: Yes
53) There is a plumbing leak, from the main bath toilet, into the crawl space. That toilet is clogged or blocked (as are other fixtures, see "interior" report section). However, this leak at the floor indicates failure of the wax ring that seals the toilet to the floor flange. I recommend further review, immediate repair of plumbing problems onsite, work to be completed by a licensed plumber. As work commences, if any structural damage becomes apparent as a result of leaks, repair accordingly.
Photo 53-1 Leak around toilet
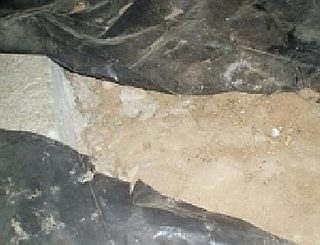
54) The plastic vapor barrier ground cover requires repair or more material added. I recommend repair, positioning vapor barrier so all soil is covered in the crawl space -- reduces the risk of attracting wood destroying organisms. Where additional material is required, I recommend putting in place 6 mil polyethylene with seams overlapped at least 24". Work to be done by qualified party.
Photo 54-1 Example, out of place ground cover
55) Cardboard forms have been left on the concrete pier footings. This is a conducive condition in that cellulose material can be food for wood destroying organisms. I recommend removing as much of the cardboard as is possible. It pulls off better if it is dampened. I checked this cardboard, and it seemed to pull of quickly without much trouble.
56) Some crawl space vents are at, or below, grade and have no wells to keep soil from blocking them. That applies at the back of the house and it impedes ventilation and can allow rain or run-off water to enter. This has been defined by the State of Washington as a conducive condition that can lead to attracting wood destroying organisms. I recommend putting in wells that provide proper separation (2" to 3") from the soil to the bottom of the vent. Use pressure treated lumber for the framework or buy metal or plastic wells at home improvement stores. Dig down significantly deeper than the lower edge of the vent then fill it with pea gravel to within 3" of lower edge. Furthermore, keep crawl space vents open year round, except in the most extreme cold weather. To see a photo of a well please visit: http://goo.gl/ZN3sNY
57) This home, based on visible areas, appears to have bolts that attach structural lumber or the sill plate to the concrete foundation. Bolts are usually partially or fully concealed and a home inspector does not count bolts or measure the spacing between them to determine if they meet any past or present building guidelines.
58) Carbon Monoxide Alarms: A preliminary review indicates that no carbon monoxide (CO) alarms are installed on premises. An approved carbon monoxide (CO) alarm should be installed either outside or, if necessary to provide sufficient coverage, inside each separate sleeping area. An inspector does not test, count, or determine the functionality of, or evaluate placement for, consumer alarms (carbon monoxide or smoke). Therefore, I recommend that client further review the interior of the property and, as/if required, add or reposition alarms so as to comply with established safety guidelines and manufacturers' specifications. Occupants should regularly test and replace batteries in alarms and replace any old or nonoperational alarms (10 years is the maximum estimated design life). Clients may obtain detailed information on CO alarms at: http://www.homesafe.com/coalert/detect.htm
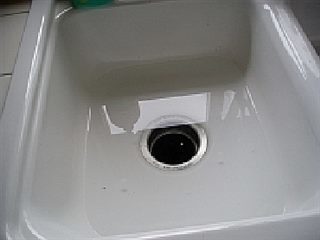
59) Sinks: All sinks were inspected. The kitchen sink does not drain at all, it's fully clogged: Seems to be related to a system blockage at the waste line. I recommend further evaluation of onsite plumbing issues, with work to be completed by a qualified plumber.
Photo 59-1 Slow drain, kitchen
60) The refrigerator/freezer is Kenmore brand. It was inspected: The gaskets are torn, obviously not sealing well. Furthermore, plastic shelves and interior surfaces are cracked. I recommend further review, probable replacement, with work to be completed by qualified appliance repair or installation professional.
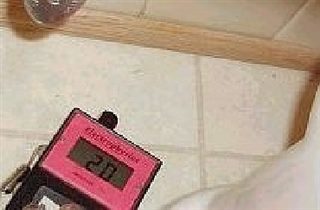
61) Toilets: Three toilets were inspected. The master bath toilet, as noted in the crawl space section, is clogged and leaking. And see another drainage related concern, at "sinks", in this report section. Moisture readings around the half-bath toilet were elevated beyond normal range -- indicative of seepage around the wax ring that seals the toilet at the flange. I recommend further evaluation, repairs as necessary, with work to be performed by a plumbing contractor.
Photo 61-1 Half-bath: 20% moisture reading at floor -- high!
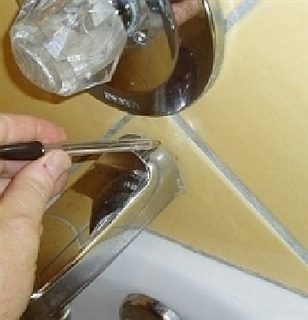
62) Tubs and showers: There were 2 tubs and a shower inspected. There is a gap behind the spout at the hall bath tub. This deficiency can allow moisture entry behind a spout or into the wall cavity. Install an escutcheon trim plate behind the spout. Work to be completed by a qualified party such as a plumber.
Photo 62-1 Gap at spout
63) Smoke Alarms: Alarms were installed at the home. Inspector does not test the functionality of smoke detectors. On a regular basis, put in new backup batteries and replace any aged alarms (ten years of age or older). To obtain additional information on smoke alarms, please visit: http://goo.gl/e0Ok71
64) Inspector has viewed walls, ceilings, doors, carpets, floors, cupboards, countertops, cabinets, closets, sinks, tubs, etc. Normally a home will show signs of past use so, unless specifically noted, the features appear to be typical. Some areas may be obscured by belongings, furniture, drapes, wall hangings or other storage. A home inspector is looking for significant issues and it is not the focus of the report to comment extensively on cosmetic matters (nail-pops, scuffs, blemishes, sliding drawers, etc), normal wear, minor mechanical wear or damage. Since the design and appearance of interior decor is important to a buyer and largely a matter of personal taste, I recommend that purchaser ascertain prior to closing that the interior -- floor coverings, cabinets, cupboards, etc -- meets with personal expectations.
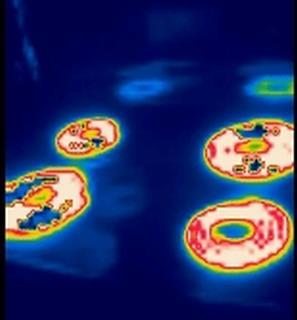
65) The Kenmore range is 240V electric. It was inspected: All burners operated, as did the broiler and the oven elements.
Photo 65-1 Thermal footprint: Infrared testing instrument shows that all burners at electric range were operational when tested
66) The Broan range hood fan was operated. Inspection results: Operable, no defects noted.
67) There is a Kenmore dishwasher. It was inspected: No leaks were noted during normal operation. The unit, properly so, was plumbed with an air-gap device. Most jurisdictions now require a visible air-gap device that reduces the chances of a cross-connection between gray water and potable water.
68) The Kenmore food disposal was operated. No leaks or defects were noted. Per serial number, the device is 2 years of age. Disposals have a design life of 10 to 12 years.
69) The interior exhaust fans, bathrooms, laundry, range hood, operated and they terminate outside. All small household exhaust fans require periodic maintenance -- cleaning, oiling of motors or eventual replacement.
70) The microwave oven is portable, it was not inspected.
Home appliance estimated design life: 1. Gas furnace: 15-20 years 2. Gas boiler: 17-24 years 3. Oil furnace: 18-25 years 4. Electric furnace: 18-25 years 5. Heat pump: 15 years 6. Central air conditioning: 15 years 7. Water heater (tank): 8-12 years 8. Water heater (tankless): 20+ years 9. Range and oven: 18-20 years 10. Refrigerator/Freezer: 18-20 years 11. Dishwasher: 9-11 years 12. Microwave oven: 10 years 13. Range hood and fan: 14 years 14. Food disposal: 10-12 years 15. Garage door opener: 10 years 16. Laundry washing machine: 14 years 17. Laundry dryer: 14 years 18. Bathtub/Sink: 10-30 years 19. Smoke or CO detector: 8-10 years 20. Exhaust fans: 10 years
Home Maintenance Check List
Monthly: 1. Clean any removable dishwasher filters. 2. Purge food disposal by filling the kitchen sink with clean water, then turn on the device until the water drains through. 4. Wash refrigerator/freezer interior walls and door gaskets with a solution of one quart of warm water to two tablespoons of baking soda and wipe dry. 5. Vacuum and clean "return" air ducts/grills. 6. Inspect lighting fixtures and replace any burned-out bulbs. 7. Clean clothes dryer lint trap and/or duct for better energy efficiency and to decrease the risk of fire.
Quarterly: 1. Inspect and service doors by cleaning and lubricating latches, hinges or replacing weatherstrippings as might be required. 2. Inspect and repair, if necessary, exterior caulking and finish around windows, doors, and siding. 3. Replace/clean, at least quarterly, furnace, heating and cooling system filters. 4. Re-tighten knobs and pulls on cabinets. Clean and lubricate drawer tracks and guides.
Semi-annually: 1. Inspect and test smoke and carbon monoxide alarms. Replace backup batteries as might be required. 2. Test (GFCI) ground fault circuit interrupters and (AFCI) arc fault breakers. 3. Inspect and maintain/clean gutters and downspouts. Runoff water must be directed away from the home. 4. Inspect attics and substructure areas for rodent droppings or other signs of pests or leaks/standing water, etc. 5. Prior to the beginning of the rainy season, test sump pumps for adequacy and function. 6. Look for moisture or decay, outside and inside the house, where flat surface decks and landings attach to the home. This is especially important if the landings do not have proper flashings. 7. Clean range hood fan grills and housings. 8. Use a vacuum cleaner to remove dust on coils behind the refrigerator/freezer.
Annually: 1. Licensed contractor to inspect and service heating and air conditioning systems. 2. Professional contractor to inspect and service wood burning appliances and chimneys. 3. Seal any foundation cracks. 4. Inspect, clean and lubricate garage vehicle door tracks and test auto-reverse functions. 5. Clean and lubricate sliding glass door and window tracks. 6. Inspect exterior paint for cracking and wear. Repaint, caulk and seal as needed. 7. Reseal, as required, wood decks and landings. 8. Inspect, for water damage, pests or rot, any substructure and attic areas. 9. Inspect roof flashings, chimney caps, shingles. 10. Inspect outside electrical service lines for damage, exposed wires or proximity to tree limbs. 11. Inspect all supply hoses at sinks, toilets and washing machines. 12. Clean and repair caulking or grout in bathrooms or kitchens. 13. Clean bathroom exhaust fan blades and grills. 14. Inspect all electric cords and replace as needed. 15. Change water filters and have fresh water systems professionally serviced.
Tips for keeping drains clear: 1. Pour a pot of hot water down the drain once a week to help clear away fat or grease that may have built-up in the drain line or the P-trap. 2. If a drain is clogged, try pouring 1/2 cup of baking soda and 1/2 cup of white vinegar down the drain. Cover the drain and let the mixture sit for a few minutes. Then pour a pot of water down the drain.
General safety tips: Ensure that you know where the following items are located: 1. Emergency contact telephone numbers. 2. Fire extinguishers and water hose pipes. 3. Heating gas/fuel main shutoff valve. 4. Main electrical disconnect circuit breaker(breaker box/service panel). 5. Main drain line clean-out. 6. Main water shutoff valve. 7. All window and door exits.
King of the House, Inc Steven L. Smith, President (360) 676-6908


 Furnished home limitations: This home is furnished; therefore, numerous wall, floor and or ceiling surfaces were obscured by furniture and other items, limiting the inspection of some areas.


 Balcony/deck: Guardrails at the high wood back deck are wobbly and unstable. Positive connections are missing at the tops of the high columns that provide critical support. Wood decay (rot) was evident at joists and wood decking. A cross brace, that runs between the columns, has decayed. There is no metal flashing where the balcony meets the side of the house -- conducive to moisture seepage into the exterior wall. I recommend further evaluation, and appropriate repairs, with all work and safety upgrades to be performed by a licensed contractor. When job is complete, refinish the structure with a preservative/sealant to protect against moisture penetration. A short video, produced by King of the House Inc., on the topic of rot or wood decay fungi may be accessed at this link: http://youtu.be/6p8q1Pa1H_U
 The column that holds up the front porch roof, due to settling of the porch slab below, is no longer supported. It no longer has bearing. The slab has sunk 1 1/2" to 2" at this side. This is a structural issue that has led to sag of the roof. I recommend further assessment, and appropriate repair, with work to be performed by a qualified party such as a concrete/paving contractor.


 The sidewalk is cracked near the corner of the garage and, due to variations in the surface height, the crack may pose a trip hazard. I recommend that clients review condition of pavement and, if concerned, consult with a qualified concrete contractor.
 When it is feasible to do so, an inspector will traverse the attic. If, in the inspector's opinion, doing so could be hazardous to the inspector or damage components in the home, the attic will not be traversed. At this home the attic does not have a floor over the ceiling structure and insulation obscures the ceiling structure. The attic is not safe to traverse at some locations because there is the risk that an inspector might step off a structural member and damage the ceiling below. Furthermore, it is undesirable to compress insulation. Therefore, following those established guidelines, this attic was partially traversed. It was viewed from the access hatch and from the area just up inside the hatch. Some locations are excluded from view. That is a necessary limitation to the inspection.