
![]() ReportHost for tablets version 2 lets you record your findings during an inspection and then upload your findings to your working report on our website. No internet connection is needed during an inspection. ReportHost for tablets is a "web application" and only requires a modern browser. It works on most tablets and phones, and on laptops and desktop computers.
ReportHost for tablets version 2 lets you record your findings during an inspection and then upload your findings to your working report on our website. No internet connection is needed during an inspection. ReportHost for tablets is a "web application" and only requires a modern browser. It works on most tablets and phones, and on laptops and desktop computers.
The first time you run ReportHost for tablets you'll need to add your ReportHost user account and to check to see if your tablet's camera is compatible with it. Details on first time startup are here.
Here's the basic workflow for inspecting and producing a report. Links to detailed instructions are shown in red, instructions for other steps can be found in other tutorials. It's best to use a desktop or laptop computer with a keyboard and mouse for the steps after uploading a report.- Start your new report
- Record your findings
- Close a report
- Review a report
- Upload a report, and then:
- Log on to the ReportHost website with a web browser.
- If you took pictures with a traditional digital camera, upload those pictures.
- Enter captions for your pictures, add arrows or circles to them, and rotate them as needed.
- Edit your report title.
- Use the "Spell check and assign pictures" option to proof read, do final edits, and to assign pictures to concerns if needed.
- Publish your report.
- Take pictures for a concern or the report title
- Open a report
- Delete a report
- Upload pictures only
- Edit your title information
- Clone a report section
- Delete report sections
- Rename a report section
- View inspection reference sheets
- The Remember feature
- Hide report to prevent accidentally affecting it
- Add a user account
- Switch user accounts
- Delete a user account
- Set your preferences (e.g. preferred font size)
First time start up
ReportHost for tablets is an offline web application. You don't need to download and install software. By navigating to the URL shown below with your device's browser, all its resources will be automatically downloaded to your device. If you're asked if you want to allow the web page to store data for offline use, answer "Yes".
Apple iPad Safari users, turn off "Private Browsing" if you have it turned on.
Go to this URL with your device's browser: https://www.reporthost.com/rh4t2.asp
You'll need to add a user account. ReportHost for tablets will prompt you for your username and password. If you're a registered ReportHost user, enter you username and password exactly as they appear in your user account info. Passwords are case-sensitive. If you can't easily remember your username or password, change them here.
If you're not a registered user and are just trying it out, enter guest for the username and inspector1 for the password. Note that if you do eventually become a registered user, you'll need to add your real ReportHost user account, then delete the guest account from your device.
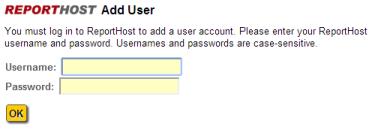
The add user dialog
![]() After adding your user account, you'll see ReportHost for tablets' main screen. You can add a shortcut icon shown at the left to launch ReportHost for tablets from your device's home screen. See these links to learn how:
After adding your user account, you'll see ReportHost for tablets' main screen. You can add a shortcut icon shown at the left to launch ReportHost for tablets from your device's home screen. See these links to learn how:
android home screen website shortcut | ipad home screen website shortcut
If you tried ReportHost for tablets with our guest account, and now you want to use your real ReportHost user account, you'll need to add your user account, then delete the guest account from your device.
If you've used an older version of ReportHost for tablets, you should delete any reports in that older version, and delete the icon for that version from your device's home screen if you've added one.
Start a new report
You'll need an internet connection to start a new report. Click the "New" button on the main screen. ReportHost for tablets will retrieve a list of your templates from our servers and then ask you to select a template for your report. Enter the client name and property address. You can change them after you upload your report, so abbreviations are fine here.
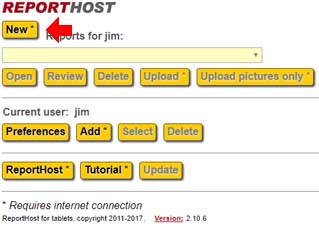
The "New" button on the main screen
The "Storage" indicator shows how much remaining space you have for reports and pictures. Android devices have 5MB of space per browser, and iOS devices have 2.5MB of space per browser. Make sure to delete old reports after you've uploaded and published them to free up space. You can always install multiple browsers (e.g Chrome, Firefox) on your device. That way you can effectively double or triple your storage space by using different browsers for different reports.
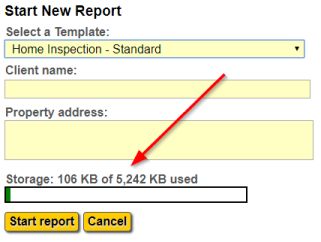
The start new report dialog showing the local storage indicator
Click the "Start report" button and the report editing screen will be displayed showing the first section of the report.
Record your findings
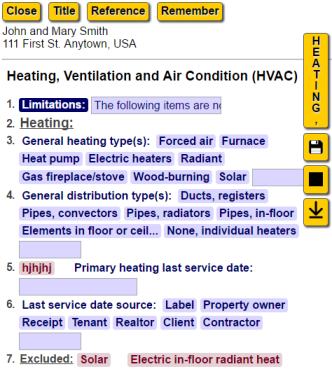
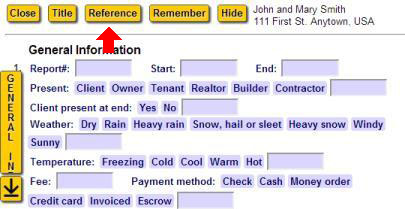
You don't need an internet connection to record your findings. You can turn your tablet off after starting reports, drive to your inspection where there's no internet connection, turn your tablet back on, navigate to ReportHost for tablets' URL (https://www.reporthost.com/rh4t2.asp), and open your report(s) for editing. After you open a report or start a new one, you'll see yellow buttons for editing your report title, viewing reference sheets, and using the "Remember" feature at the top of the page. Floating buttons on the right side let you jump to the top or bottom of the page, change report sections, save your report and hide the report.
Descriptions are shown in blue and concerns are shown in pink.
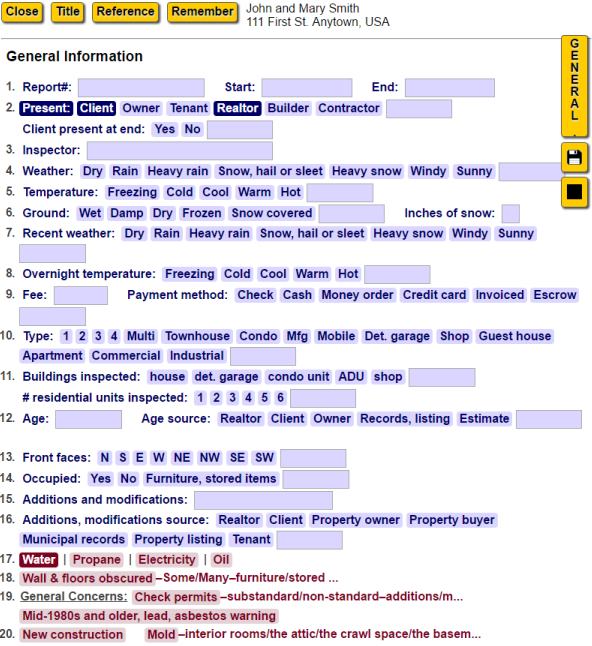
The edit report screen
While inspecting, you'll need to select various items, and enter or change text in items. Here's how, depending on the type of item:
Single line fill-in-the-blank descriptions:
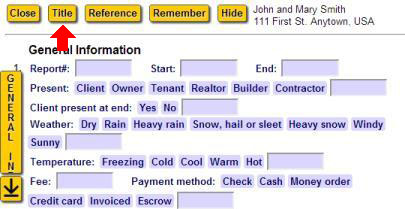
An example of a fill-in-the-blank description is the start time item in the "General Information" section. Click the blue rectangle to the right of the description's field notes label ("Start" in this case) to enter text. When focus leaves the edit field, the description's label will turn dark blue to show that it is selected to be included in your report. Items that aren't selected won't appear in your report. You can unselect it by clicking the dark blue label, or by deleting the text in the edit field.

Unselected, no text |

Editing the text |

Selected, with text |
Multiline fill-in-the-blank descriptions
There's no visual difference between a multiline vs. a single line fill-in-the-blank description. However when you click a multiline description, a dialog will open with a multiline edit control for entering text. This makes it easier to enter a lot of text, or multiple lines or paragraphs of text. The "Limitations" statements at the beginning of many report sections in our templates are multiline fill-in-the-blank descriptions. Note that the limitations descriptions in our templates are pre-selected, so they're automatically selected to be included in your reports.

A pre-selected multiline fill-in-the-blank description
Click the blue rectangle containing the description's text to the right of its label to edit the text. A dialog will open with a multiline edit control for editing.

The mulitline description dialog
The green check on either the "Select" or "Unselect" button in the dialog indicates the current selection state of the description. Click either button to close the dialog and select or unselect the description. The description's field notes label will be highlighted with the dark blue if you select it.
Multiple choice descriptions
For multiple choice descriptions such as the "Temperature" item in the "General Information" section, simply click choices to select or unselect them. Selected choices will be highlighted in dark blue. Each multiple choice description has blank edit field to its right that lets you enter whatever text you want in case none of the default choices are applicable. Click the blue rectangle to the right of the choices to enter that text. Selecting choices or entering text will select that description to be included in your report. Unselect all choices and delete text in the edit control to unselect the description, or simply click its highlited field notes label to unselect it. Any text you've entered will be deleted when you do.

No choices or text selected |

One choice selected, with text |
Standard concerns
Standard concerns look like this:

A concern about lead and asbestos from the "General Information" report section
Click the concern to open a dialog that lets you edit, select or unselect the concern. You'll be able to edit the concern text, change the selected concern types, enter a cost estimate, or take pictures for the concern. For more information on taking pictures for concerns, see this.
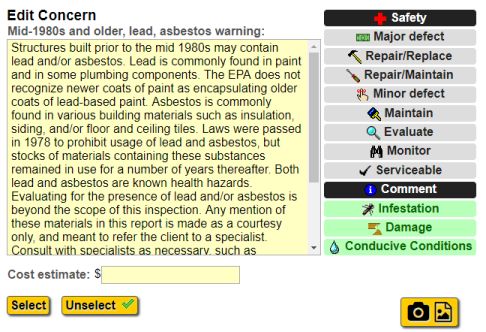
The edit concern dialog
Note that ReportHost for tablets has a preferences setting where unselected concerns will be selected vs. opened for editing when you click them. If the former preference is chosen, then clicking the selected concern again will open it for editing. See the Preferences section of this tutorial for more information about this.
Multiple choice concerns
Multiple choice concerns have one or more sets of choices within their concern text that allow them to be used for a variety of situations. In ReportHost for tablets they look like standard concerns, but choices appear as text to the right of the concern's field notes label. The text for long sets of choices may be truncated when viewing a report section. For more information, see this tutorial on Understanding multiple choice concerns.

A multiple choice concern about things being obscured from the "General Information" report section
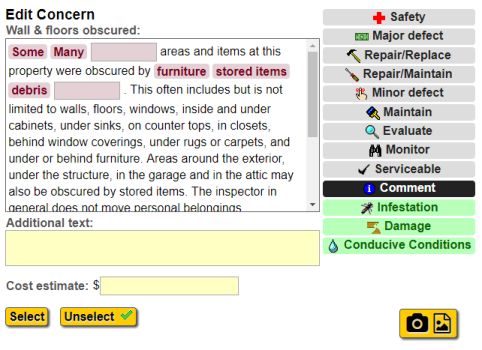
The edit multiple choice concern dialog
You can select one or more choices from each choice set, or enter text in the editable field to the right of each choice set. This is similar to how multiple choice descriptions work.&nsp; The "Additional text" field allows you to append whatever text you wish to the end of the concern text.
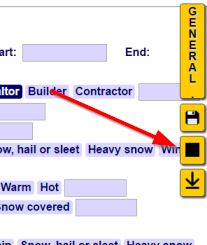
Navigating and saving
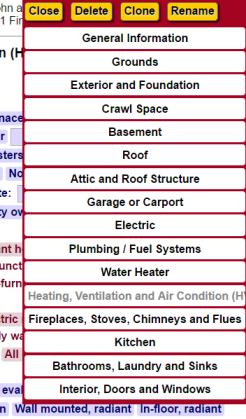
Floating buttons on the right allow you to jump to the top or bottom of a section, change sections, save your report, or hide the report. The name of the section you're viewing is displayed in the large middle button. Long section names may be truncated when displayed on this button. Click the section button to open the sections menu. The current section's name is shown in grey. Click any section name to view that section for editing.
The floating side buttons, from top to bottom; jump to top, open sections menu, save, hide report, jump to bottom |
The section menu opened, with the current section's name shown in grey text |
Your report is saved automatically when you change sections, but you can also click the save button (the disc icon) to save when you wish. The button with the black square hides your report from view so you don't accidentally affect your report when carrying or holding your device.
Close a report
While editing any report section, scroll back to the top of the section information and click the "Close" button at the top left corner to close your report and return to the ReportHost for tablet's main screen. Your report will be saved automatically.
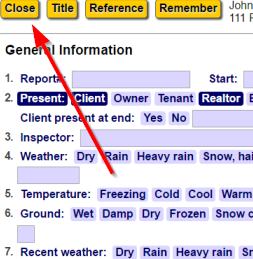
The "Close" button
Review a report
To review your findings with your clients at the end of an inspection, return to ReportHost for tablet's main screen, select a report from the reports list and click the "Review" button. When you do, you'll see a version of your report very similar to how the published report will appear. You can then easily scroll through your findings. Note that you can hide all descriptions and/or pictures when reviewing a report.

The "Review" button and list of reports
Upload a report
To upload your report to the ReportHost website for final edits and publishing, return to ReportHost for tablet's main screen, select a report from the reports list and click the "Upload" button. If you haven't logged in yet, you'll be asked to enter your ReportHost username and password.
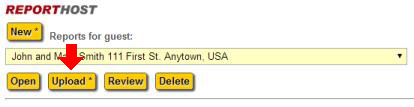
The "Upload" button and list of reports
Your working report status
A dialog will then show the status of your working report. The icon at the right shows whether it's been published or not. = Uploaded
  = In progress
  = Revised
  = Published
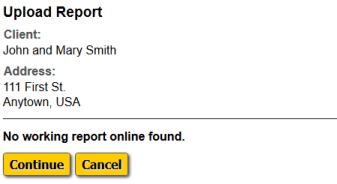
The working report status in the upload report dialog when you have no working report on the ReportHost website |

The working report status when it wasn't uploaded and hasn't been publishded |
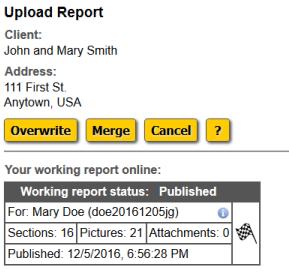
The working report status when it has been published |
If you don't have a working report online, click the "Continue" button to upload. If you do have a working report online, then you can either click the "Overwrite" button to delete your working report online and then upload (what most inspectors should do), or click the "Merge" button to add your report information to your working report online. The merge option is meant for multiple inspectors working as a team on the same inspection.
If you click the "Overwrite" button and your working report hasn't been published yet, you'll see one more confirmation message warning you about overwriting your working report. Make sure you publish your working report first if you need to before overwriting it.
See steps seven through 10 listed above for what to do after uploading.
Take pictures for a concern or the report title
ReportHost for tablets lets you take one or more pictures with your device's camera when you're editing a concern or your title information. The pictures you take will automatically be assigned to that concern or to your title, then resized and uploaded when you upload your report. Pictures will be resized according to the dimensions you set in your picture preferences. Choose "Preferences->Picture options" from the website menus to change these preferences.
Be aware that with most mobile devices, the pictures you take via this option won't be saved in your device's photo collection (gallery, camera roll, etc.), and will only be saved in ReportHost for tablets.
Depending on your device and browser, a camera button and a select-files button will be displayed, or a single button will be displayed. Click the camera button to directly activate the camera. Click the select files button to select an existing image from your device's gallery or camera roll. Or click the alternate single button to do either.
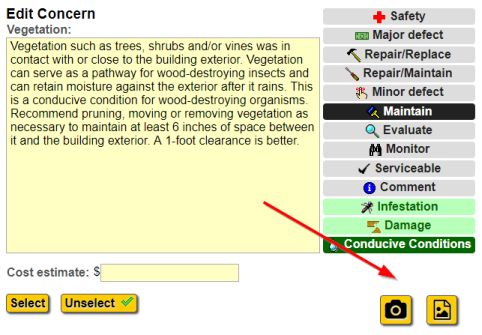
The camera and select-files buttons in the edit concern dialog

The alternate single button that allows you to activate the camera or select-files
After you take a picture, it will be displayed in the "Select pictures" dialog.
Click the camera or select-files buttons in the "Select pictures" dialog to add more pictures for the concern or title.
Click the "Close" button to close the select pictures dialog and return to the edit concern or edit title dialog.
Click the "Close and select concern" button to close both the select pictures and edit concern dialogs, and to select that concern.
The 3 yellow buttons at the upper right (with the mountain picture) change the size of the pictures in this dialog. They have no effect on the size of the pictures in your report.
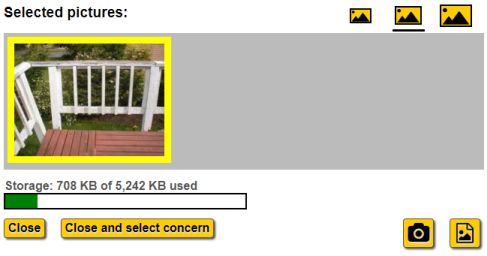
The select pictuers dialog with one picture taken for this concern
When you close the select pictures dialog, the number of pictures for the concern or title will be displayed by the camera buttons. Once one or more pictures have been taken or selected, a file-open button will be displayed that lets you open the "Select pictures" dialog so you can review or delete pictures.
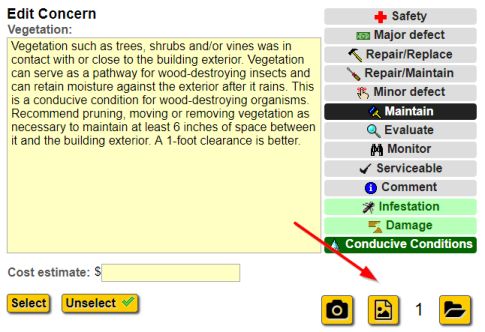
The edit concern dialog showing that one picture has been taken for the concern
When you close a concern with pictures, its caption will turn yellow rather than white.
Concerns with pictures assigned to them appear with yellow captions.
Click the "Pictures" button at any time to take additional pictures for a concern or your title. You can delete pictures for a concern by opening the select pictures dialog for that concern, then click the pictures you wish to delete to unselect them. When you do, the yellow highlight around the edge of the pictures you clicked will disappear. When you close the select pictures dialog those pictures will be deleted. Note that when you unselect a concern with pictures, the pictures for that concern will be deleted.
Open a report
To open a report for editing, select a report from the reports list on ReportHost for tablet's main screen. When you do, the buttons below the list will be enabled. Click the "Open" button to open the selected report. The report editing screen will be displayed showing the first section of the report.
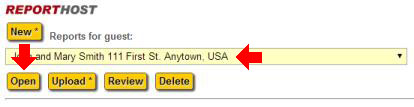
The "Open" button and list of reports
Delete a report
After you've uploaded and published your report, you should delete it from ReportHost for tablets so you'll have enough local storage space to store other reports and pictures. To delete a report, select a report from the reports list on ReportHost for tablet's main screen. Then click the "Delete" button to open the selected report. A confirmation prompt will appear asking if you really want to delete the report. Click the "Delete" button to confirm.
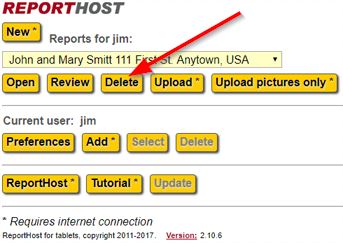
The "Delete" button and list of reports
Upload pictures only
You may need to upload one or more pictures without uploading your report. For example, if you make a mistake adding an arrow or circle to a picture. You'd want to delete the picture from your working report, then upload it again. This option lets you select specific pictures from any report to upload to your working report. Select a report from the reports list and click the "Upload pictures only" button on ReportHost for tablet's main screen.
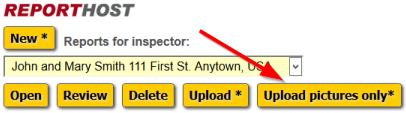
The "Upload pictures only" button
When you do, your working report's status will be displayed similar to how it is when you upload a report. Click the "Select pictures" button to proceed.
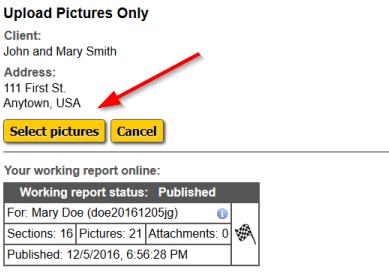
The "Select pictures" button
All pictures for the report you selected will be displayed. Click individual pictures to select or unselect them. Selected pictures will appear with a yellow highlight around them. Click the "Close" button to return to the upload pictures dialog, then click the "Upload" button to upload the selected pictures to your working report.
Note the "All" and "None" buttons near the top that allow you to select all pictures at once, or to unselect all pictures. The 3 yellow buttons at the upper right (with the mountain picture) change the size of the pictures in this dialog. They have no effect on the size of the pictures in your report.
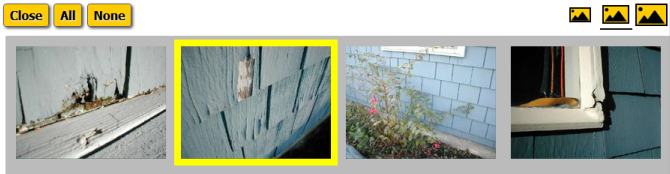
Pictures for a report, with one selected for uploading
Edit your title information
When you have a report open for editing, click the "Title" button at the top of the page to edit the client name and property address, or to take one or more pictures for your report title. Click the "Close" button to close the dialog. Your report will be saved automatically.
The "Title" button
Clone a report section
When you have a report open for editing, click the floating report sections button to open the report sections menu. Then click the "Clone" button.
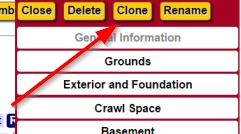
The "Clone" button
A dialog will open that lets you select the section to clone, determine what position the new section will have, and name the new section. Section names must be unique within a report. The "local storage" indicator is displayed here to warn about low space conditions, since cloning large sections may consume significant amounts of local storage. Click the "Clone section" button to clone the section and close the dialog. Your report will be saved automatically.
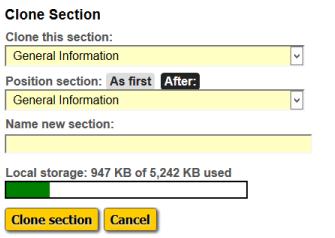
The clone section dialog
Delete report sections
When you have a report open for editing, click the floating report sections button to open the report sections menu. Then click the "Delete" button.
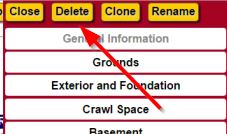
The "Delete" button
A dialog will open that lets you select one or more sections to delete. Select the desired sections and click the "Select sections" button.
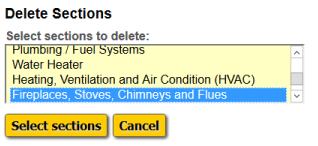
Step 1 of the delete sections dialog, select the sections
A confirmation step will appear that displays a list of the section names that you selected, and asks if you want to delete those sections. Click the "Delete sections" button to delete the sections. Your report will be saved automatically. If you delete the section you're currently viewing, the first section in your report will be displayed. You can not delete a section if it's the only section in a report.
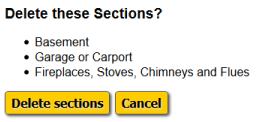
Step 2 of the delete sections dialog, confirm the delete
Rename a report section
When you have a report open for editing, click the floating report sections button to open the report sections menu. Then click the "Rename" button.
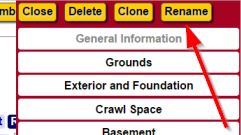
The "Rename" button
A dialog will open that lets you select a section to rename, and enter a new name for that section. Section names must be unique within a report. Click the "Rename section" button to rename the section and close the dialog. Your report will be saved automatically.
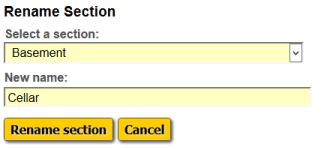
The rename section dialog
View inspection reference sheets
Both ReportHost for tablets and the ReportHost website have reference sheets that help you determine manufacture dates, capacities and ratings of various components in a building. To access them, click the "Reference" button when you have a report open for editing.
The "Reference" button
Partial view of a reference sheet will be displayed along with a drop-down selector to choose and view other reference sheets. Scroll down to see info as necessary. Click the "Close" button to return to the main screen.
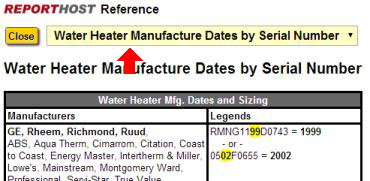
A reference sheet that helps you determine water heater manufacture dates
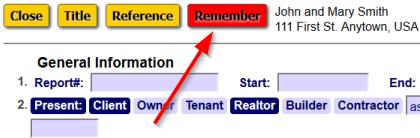
The Remember feature
When you have a report open for editing, click the "Remember" button at the top of the page to open the Remember feature. Nothing you do here will affect your report. It simply lets you note that you've changed something in the house or building that your inspecting, so you don't forget to put things back to the way they were.
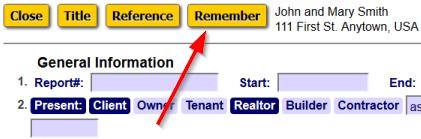
The "Remember" button
When you click the "Remember" button, the remember dialog will open. Typical uses for the Remember feature include noting that you've changed a thermostat setting, turned a circuit breaker on, tripped a GFCI, have a bathtub filling or have a water shut-off valve turned on.
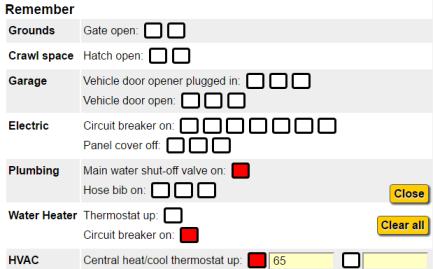
A partial view of remember dialog with some items selected, and the original thermostat setting noted
After selecting items to remember and closing the Remember feature, the "Remember" button will turn red to remind you that you've changed things. It will also appear on ReportHost for tablets main screen when it's red. When you've changed things back to the way they were, open the Remember feature again, click the "Clear all" button, then the "Close" button.
The "Remember" button turned red
Hide report to prevent accidentally affecting it
You can avoid accidentally affecting your report while carrying your device during an inspection. While editing any report section, click the floating button with the black square to hide your report. Click the "Return" button to return to your report.
The hide report button
Add a user account
While on ReportHost for tablet's main screen, click the "Add" button under the "Current user" heading. A dialog will open that allows you to enter a username and password. Enter a valid ReportHost username and password combination as you did when your added the first user account. Remember that passwords are case-sensitive. After successfully entering a username and password you'll return to the main screen and will be using that newly added user's account. You can always tell what user account you're using by seeing the username to the right of the "Current user" heading.
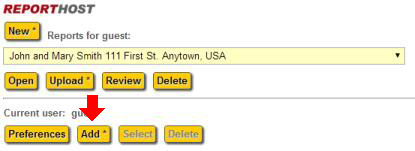
The "Add" button
Switch user accounts
While on ReportHost for tablet's main screen, click the "Select" button under the "Current user" heading. Select a username from the drop-down selector and click the "Select user" button to switch to that user account and return to the main screen. This "Select" button will only be enabled when you've added more than one user account to ReportHost for tablets.Note that your browser's local storage for storing reports and pictures is shared between all user accounts. Make sure to delete unneeded reports for all user accounts after uploading and publishing them.
The "Select" button
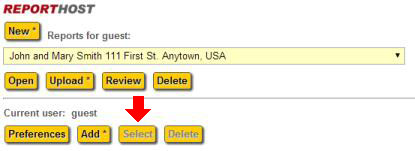
Delete a user account
While on ReportHost for tablet's main screen, click the "Delete" button under the "Current user" heading. A dialog will open that lets you select a username from the drop-down selector and click the "Delete user" button to delete that account. This "Delete" button will only be enabled when you've added more than one user account to ReportHost for tablets.
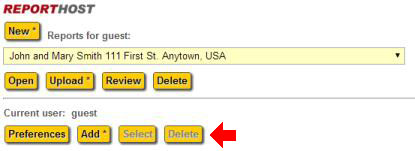
The "Delete" button
A confirmation screen will appear showing the username and any reports they may own. Click the "Delete user" button to delete that account and all reports owned by that user, and to return to the main screen. This will only affect ReportHost for tablets. Deleting a user account here will not delete it on the ReportHost website.
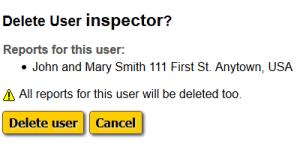
The delete user confirmation showing one report for this user
Set your preferences
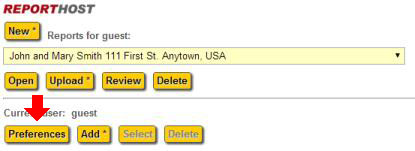
While on ReportHost for tablet's main screen, click the "Preferences" button. Preference options are preset to what we think works best, but feel free to try different settings. Click the "Preferences" button if you want to re-take the camera test.
The "Preferences" button